Table of Contents
- Introduction
- The History of the Raspberry Pi
- Raspberry Pi Versions
- Raspberry Pi Peripherals
- Operating Systems
- Power Up the Pi
- Setting up the Raspberry Pi Software
- Multiple Temperature Measurements
- Linux Concepts
- File Editing
- Directory Structure Cheat Sheet
Introduction
Welcome!
Hi there. Congratulations on being interested enough in the process of learning about measuring temperature with the Raspberry Pi to have gotten your hands on this book.
This will be a journey of discovery for both of us. By experimenting with computers we will be learning about what is happening in the physical environment. I know others have done this sort of thing, but I have an ulterior motive. I write books to learn and document what I’ve done. The hope is that by sharing the journey others can learn something from my efforts :-).
Ambitious? Perhaps :-). But I’d like to think that if you’re reading this, we’ve already managed to make some headway. I dare say that like other books I have written (or are currently writing) it will remain a work in progress. They are living documents, open to feedback, comment, expansion, change and improvement. Please feel free to provide your thoughts on ways that I can improve things. Your input would be much appreciated.
You will find that I eschew a simple “Do this approach” for more of a story telling exercise. Some explanations are longer and more flowery than might be to everyone’s liking, but there you go, that’s my way :-).
There’s a lot of information in the book. There’s ‘stuff’ that people with a reasonable understanding of computers will find excessive. Sorry about that. I have gathered a lot of the content from other books I’ve written to create this guide. As a result, it is as full of usable information as possible to help people who could be using the Pi and coding for the first time. Please bear in mind, this is the description of ONE project. I could describe it in 5 pages but I have stretched it out into a lot more. If we need to recreate the project from scratch, this guide will leave nothing out. It will also form a basis for other derivative books (as books before this one have done). As Raspberry Pi’s and software improve, the descriptions will evolve.
I’m sure most authors try to be as accessible as possible. I’d like to do the same, but be warned… There’s a good chance that if you ask me a technical question I may not know the answer. So please be gentle with your emails :-).
Email: d3noobmail+temp@gmail.com
Cover photo via Good Free Photos.
What are we trying to do?
Put simply, we are going to examine the wonder that is the Raspberry Pi computer and use it to accomplish something.
In this specific case we will be connecting several temperature probes to the Pi, measuring the values that they produce, recording them in a database and then making a graph out of that information that we can view on a web page!
Along the way we’ll;
- Look at the Raspberry Pi and its history.
- Work out how to get software loaded onto the Pi.
- Learn about networking and configure the Pi accordingly.
- Install and configure a web server and a database.
- Write some code to interface with our temperature probes.
- Make a web page that will make a pretty picture of our temperature readings.
Who is this book for?
You!
Just by virtue of taking an interest and getting hold of a copy of this book you have demonstrated a desire to learn, to explore and to challenge yourself. That’s the most important criteria you will want to have when trying something new. Your experience level will come second place to a desire to learn.
It may be useful to be comfortable using the Windows operating system (I’ll be using Windows 7 for the set-up of the devices). You should be aware of Linux as an alternative operating system, but you needn’t have tried it before. Before you learn anything new, it pretty much always appears indistinguishable from magic. but once you start having a play, the mystery falls away.
What will we need?
Well, you could just read the book and learn a bit. By itself that’s not a bad thing, but trust me when I say that actually experimenting with physical computers is fun and rewarding.
The list below is pretty flexible in most cases and will depend on how you want to measure the temperatures.
- A Raspberry Pi (I’m using a Raspberry Pi Model B 2 / 3)
- Probably a case for the Pi
- A MicroSD card
- A power supply for the Pi
- A keyboard and monitor that you can plug into the Pi (there are a few options here, read on for details)
- A remote computer (like your normal desktop PC that you can use to talk to connect to the Pi). This isn’t strictly necessary, but it makes the experience way cooler.
- Some DS18B20 temperature sensors (the waterproof kind). They are available from lots of places. Google is your friend.
- A 10k Ohm resister
- Some soldering equipment
- Some dupont connectors (that’s what I used, but you could connect to the Pi in different ways)
- An Internet connection for getting and updating the software.
As we work through the book we will be covering off the different parts required and you should get a good overview of what your options are in different circumstances.
Why on earth did I write this rambling tome?
That’s a really good question. This is another project that I wanted to update from an earlier book (Raspberry Pi: Measure, Record, Explore) and to be brutally honest I picked it at random over other options. Writing the previous books in this series was an enjoyable process, so I thought that I’d carry on and continue to adapt the book for subsequent projects. This is book three in this series and I’ve updated it since it was written, so I suppose it’s a ‘thing’ by now. Will this continue? Who knows, stay tuned…
What I can tell you is that I now have a new benchmark for building my temperature measurement project and you have a book that tells you how I did it :-).
Included is a bunch of information from my books on the Raspberry Pi, Linux and d3.js. I hope you find it useful.
Where can I get more information?
The Raspberry Pi as a concept has provided an extensible and practical framework for introducing people to the wonders of computing in the real world. At the same time there has been a boom of information available for people to use them. The following is a far from exhaustive list of sources, but from my own experience it represents a useful subset of knowledge.
The History of the Raspberry Pi
The story of the Raspberry Pi starts in 2006 at the University of Cambridge’s Computer Laboratory. Eben Upton, Rob Mullins, Jack Lang and Alan Mycroft became concerned at the decline in the volume and skills of students applying to study Computer Science. Typical student applicants did not have a history of hobby programming and tinkering with hardware. Instead they were starting with some web design experience, but little else.
They established that the way that children were interacting with computers had changed. There was more of a focus on working with Word and Excel and building web pages. Games consoles were replacing the traditional hobbyist computer platforms. The era when the Amiga, Apple II, ZX Spectrum and the ‘build your own’ approach was gone. In 2006, Eben and the team began to design and prototype a platform that was cheap, simple and booted into a programming environment. Most of all, the aim was to inspire the next generation of computer enthusiasts to recover the joy of experimenting with computers.
Between 2006 and 2008, they developed prototypes based on the Atmel ATmega644 microcontroller. By 2008, processors designed for mobile devices were becoming affordable and powerful. This allowed the boards to support an graphical environment. They believed this would make the board more attractive for children looking for a programming-oriented device.
Eben, Rob, Jack and Alan, then teamed up with Pete Lomas, and David Braben to form the Raspberry Pi Foundation. The Foundation’s goal was to offer two versions of the board, priced at US$25 and US$35.
50 alpha boards were manufactured in August 2011. These were identical in function to what would become the model B. Assembly of twenty-five model B Beta boards occurred in December 2011. These used the same component layout as the eventual production boards.
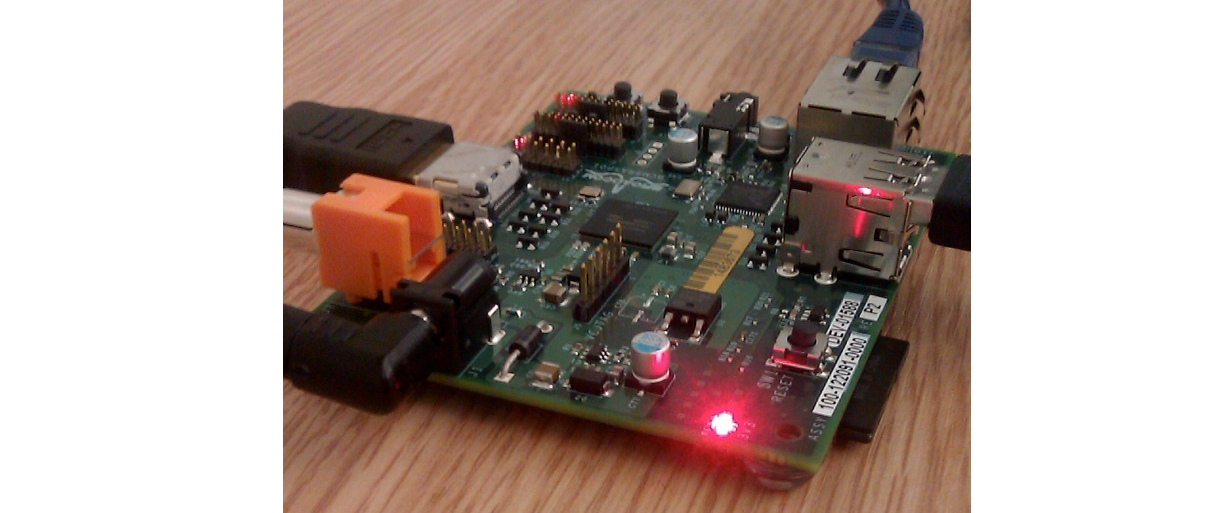
Interest in the project increased. They were demonstrated booting Linux, playing a 1080p movie trailer and running benchmarking programs. During the first week of 2012, the first 10 boards were put up for auction on eBay. One was bought anonymously and donated to the museum at The Centre for Computing History in Suffolk, England. While the ten boards together raised over 16,000 Pounds (about $25,000 USD) the last to be auctioned (serial number No. 01) raised 3,500 Pounds by itself.
The Raspberry Pi Model B entered mass production with licensed manufacturing deals through element 14/Premier Farnell and RS Electronics. They started accepting orders for the model B on the 29th of February 2012. It was quickly apparent that they had identified a need in the marketplace. Servers struggled to cope with the load placed by watchers repeatedly refreshing their browsers. The official Raspberry Pi Twitter account reported that Premier Farnell sold out within few minutes of the initial launch. RS Components took over 100,000 pre orders on the first day of sales.

Within two years they had sold over two million units.
The lower cost model A went on sale for $25 on 4 February 2013. By that stage the Raspberry Pi was already a hit. Manufacturing of the model B hit 4000 units per day and the amount of on-board ram increased to 512MB.
The official Raspberry Pi blog reported that the three millionth Pi shipped in early May 2014. In July of that year they announced the Raspberry Pi Model B+, “the final evolution of the original Raspberry Pi. For the same price as the original Raspberry Pi model B, but incorporating numerous small improvements”. In November of the same year the even lower cost (US$20) A+ was announced. Like the A, it would have no Ethernet port, and just one USB port. But, like the B+, it would have lower power requirements, a micro-SD-card slot and 40-pin HAT compatible GPIO.
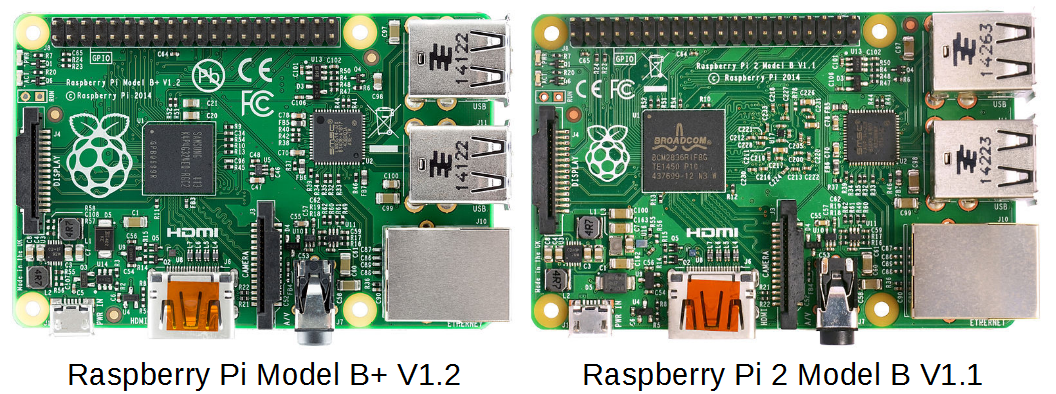
On 2 February 2015 the official Raspberry Pi blog announced that the Raspberry Pi 2 was available. It had the same form factor and connector layout as the Model B+. It had a 900 MHz quad-core ARMv7 Cortex-A7 CPU, twice the memory (for a total of 1 GB) and complete compatibility with the original generation of Raspberry Pis.
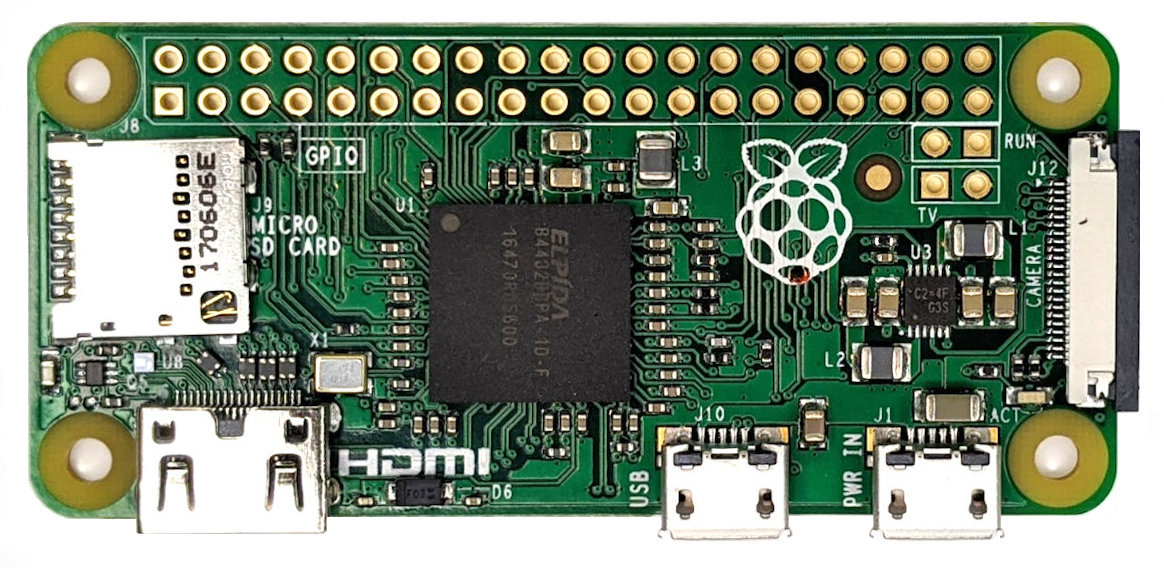
Following a meeting with Eric Schmidt (of Google fame) in 2013, Eben embarked on the design of a new form factor for the Pi. On the 26th of November 2015 the Pi Zero was released.
The Pi Zero is a significantly smaller version of a Pi with similar functionality but with a retail cost of $5. On release it sold out (20,000 units) World wide in 24 hours and a free copy was affixed to the cover of the MagPi magazine.
The Raspberry Pi 3 was released in February 2016. The most notable change being the inclusion of on-board WiFi and Bluetooth.
In February 2017 the Raspberry Pi Zero W was announced. This device had the same small form factor of the Pi Zero, but included the WiFi and Bluetooth functionality of the Raspberry Pi 3.
On Pi day (the 14th of March (Get it? 3-14?)) in 2018 the Raspberry Pi 3+ was announced. It included dual band WiFi, upgraded Bluetooth, Gigabit Ethernet and support for a future PoE card. The Ethernet speed was actually 300Mpbs since it still needs to operate on a USB2 bus. By this stage there had been over 9 million Raspberry Pi 3’s sold and 19 million Pi’s in total.
On the 24th of June 2019, the Raspberry Pi 4 was released.
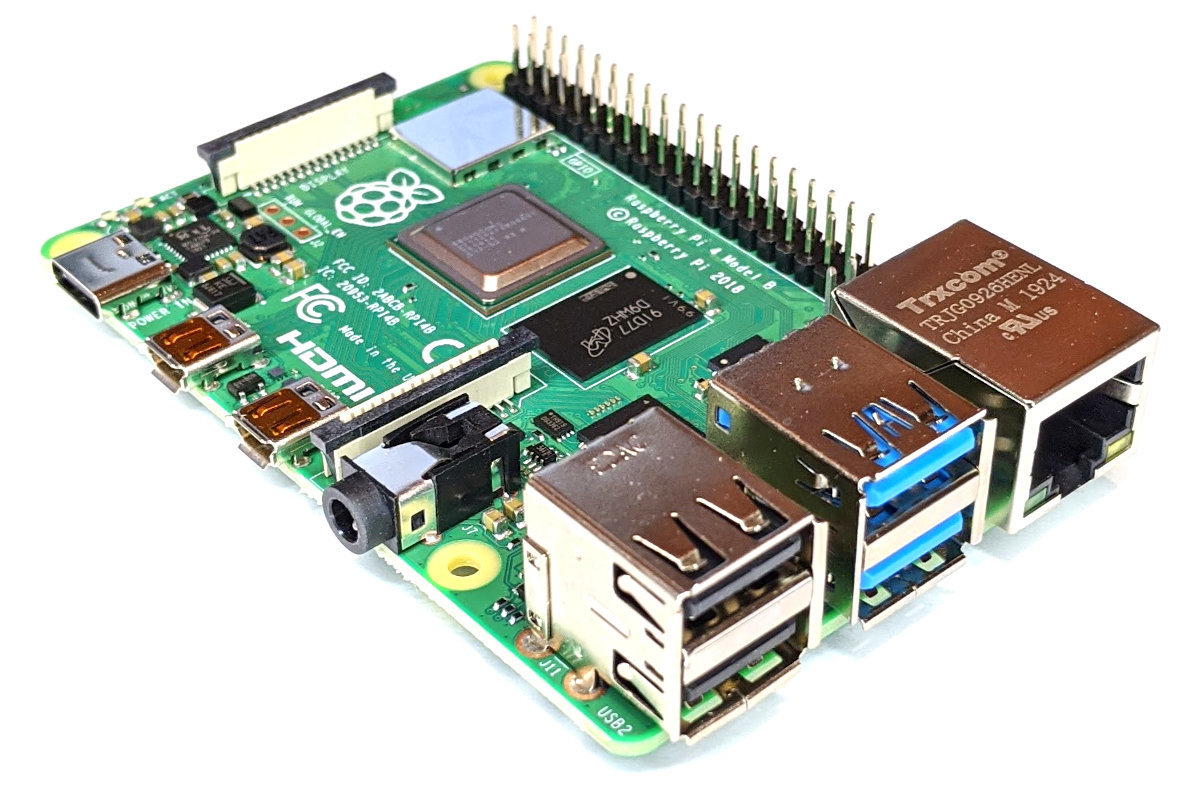
This realised a true Gigabit Ethernet port and a combination of USB 2 and 3 ports. There was also a change in layout of the board with some ports being moved and it also included dual micro HDMI connectors. As well as this, the RPi 4 is available with a wide range of on-board RAM options. Power was now supplied via a USB C port.
It would be easy to consider the measurement of the success of the Raspberry Pi in the number of computer boards sold. Yet, this would most likely not be the opinion of those visionaries who began the journey to develop the boards. Their stated aim was to re-invigorate the desire of young people to experiment with computers and to have fun doing it. We can thus measure their success by the many projects, blogs and updated school curriculum’s that their efforts have produced.
Raspberry Pi Versions
In the words of the totally awesome Raspberry Pi foundation;
The Raspberry Pi is a low cost, credit-card sized computer that plugs into a computer monitor or TV, and uses a standard keyboard and mouse. It’s capable of doing everything you’d expect a desktop computer to do, from browsing the internet and playing high-definition video, to making spreadsheets, word-processing, playing games and learning how to program in languages like Scratch and Python.
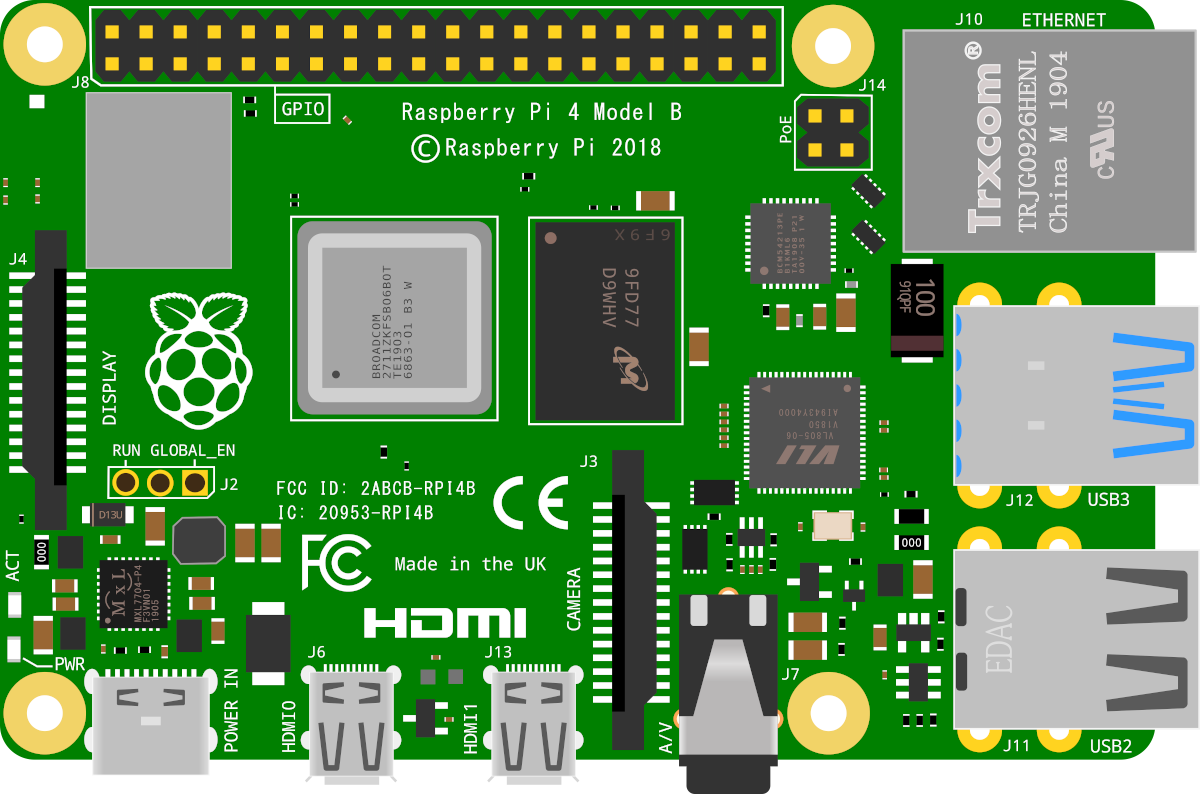
There are (at time of writing) twelve different models on the market. The A, B, A+, B+, ‘model B 2’, ‘model B 3’, ‘model B 3+’, ‘model B 4’ (which I’m just going to call the B2, B3, B3+ and 4 respectively), ‘model A+’, ‘model A+ 3’ , the Zero and Zero W. A lot of projects will typically use either the the B2, B3, B3+ or the 4 for no reason other than they offer a good range of USB ports (4), 2 - 8 GB of RAM, an HMDI video connection (or two) and an Ethernet connection. For all intents and purposes either the B2, B3, B3+ or 4 can be used interchangeably for the projects depending on connectivity requirements as the B3, B3+ and 4 have WiFi and Bluetooth built in. For size limited situations or where lower power is an advantage, the Zero or Zero W is useful, although there is a need to cope with reduced connectivity options (a single micro USB connection) although the Zero W has WiFi and Bluetooth built in. Always aim to use the latest version of the Raspberry Pi OS operating system (or at least one released on or after the 14th of March 2018). For best results browse the ‘Downloads’ page of raspberrypi.org.
Version Comparison

Raspberry Pi Peripherals
To make a start using the Raspberry Pi we will need to have some additional hardware to allow us to configure it.
SD Card
Traditionally the Raspberry Pi needs to store the Operating System and working files on a MicroSD card (actually a MicroSD card all models except the older A or B models which use a full size SD card). There is the ability to boot from a mass storage device or the network, but it is slightly ‘non-trivial’, so we won’t cover it.
The MicroSD card receptacle is on the rear of the board for all but the Zero models. On the Model B2 it is a ‘push-push’ type which means that you push the card in to insert it and then to remove it, give it a small push and it will spring out. On the others is is a push-pull connector
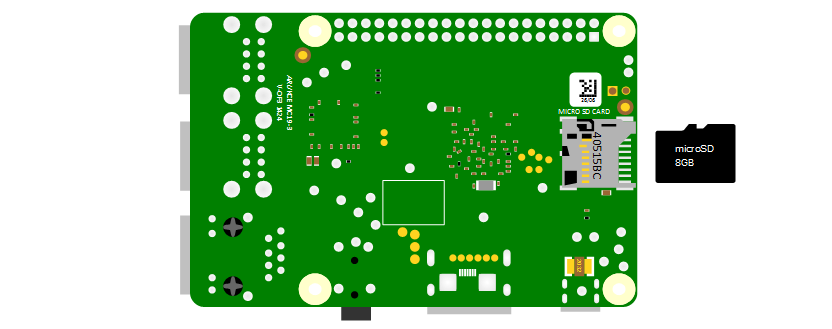
This is the equivalent of a hard drive for a regular computer, but we’re going for a minimal effect. We will want to use a minimum of an 8GB card (smaller is possible, but 8 is recommended). Also try to select a higher speed card (class 10 or similar) as this will speed things up a bit.
Keyboard / Mouse
While we will be making the effort to access our system via a remote computer, we will need a keyboard and a mouse for the initial set-up. Because the various B models of the Pi have 4 x USB ports, there is plenty of space for us to connect wired USB devices.

An external wireless combination would most likely be recognised without any problem and would only take up a single USB port, but if we build towards a remote capacity for using the Pi (using it headless, without a keyboard / mouse / display), the nicety of a wireless connection is not strictly required.

Video
The Raspberry Pi comes with an HDMI port ready to go which means that any monitor or TV with an HDMI connection should be able to connect easily.
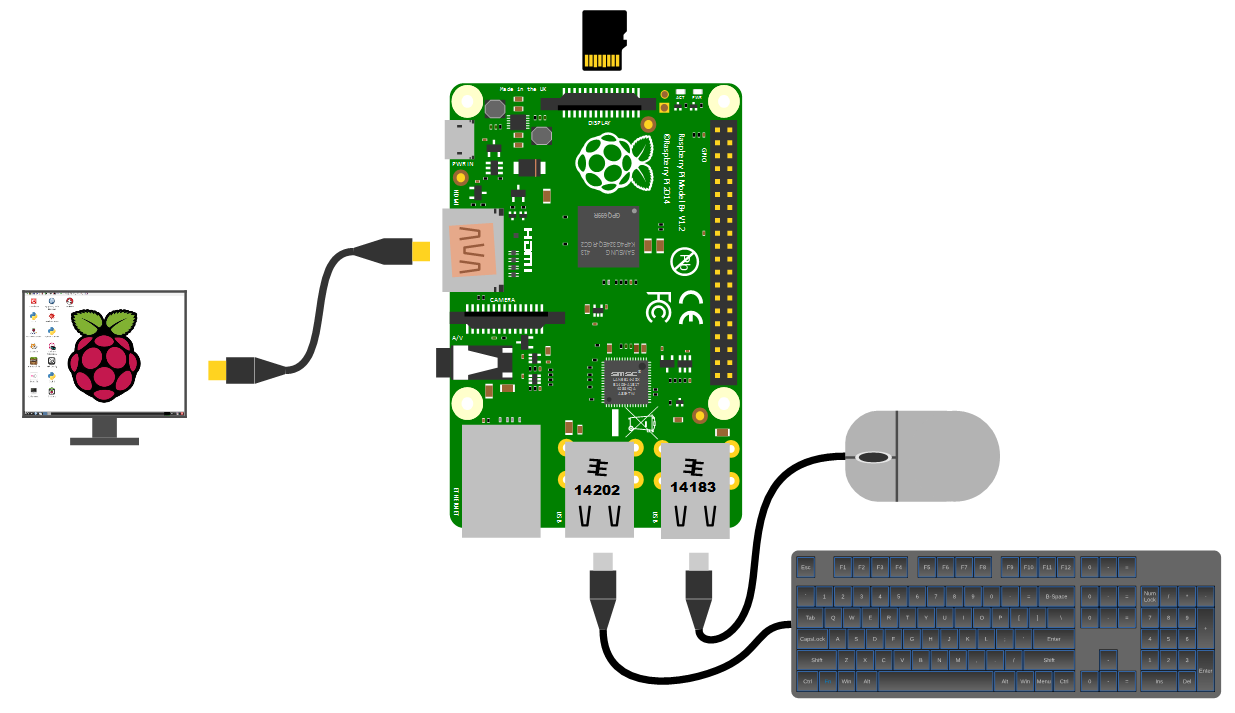
Because this is kind of a hobby thing you might want to consider utilising an older computer monitor with a DVI or 15 pin ‘D’ connector. If you want to go this way you will need an adapter to convert the connection.

Be aware that the display connectors on the Raspberry Pi 4 are a smaller form factor of the HDMI specification (micro-HDMI). Choose your cabling or adaptors appropriately.
Network
The various B models of the Raspberry Pi have a standard RJ45 network connector on the board ready to go. In a domestic installation this is most likely easiest to connect into a home ADSL modem or router.
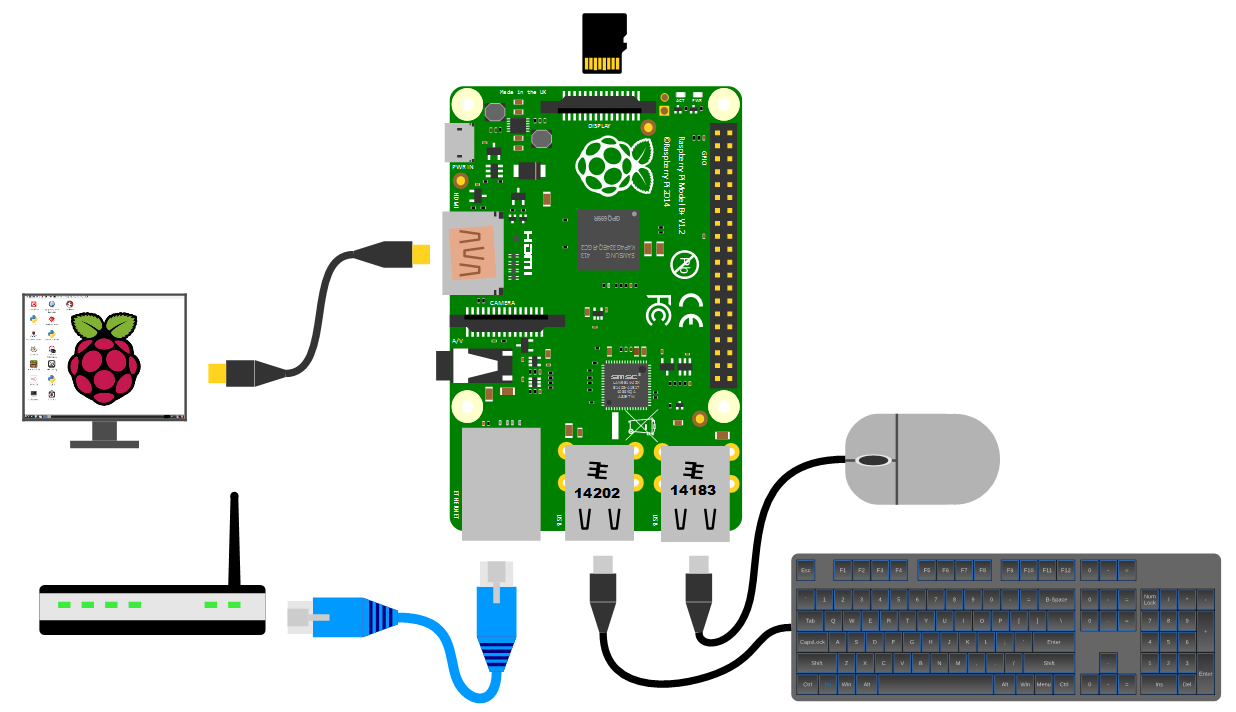
This ‘hard-wired’ connection is great for getting started, but we will work through using a wireless solution later in the book.
The speed of the Ethernet connection varies depending on the model with the later versions reaching a Gigabit.
Power supply
The Pi can be powered up in a few ways. The simplest is to use the micro USB port to connect from a standard USB charging cable. You probably have a few around the house already for phones or tablets.
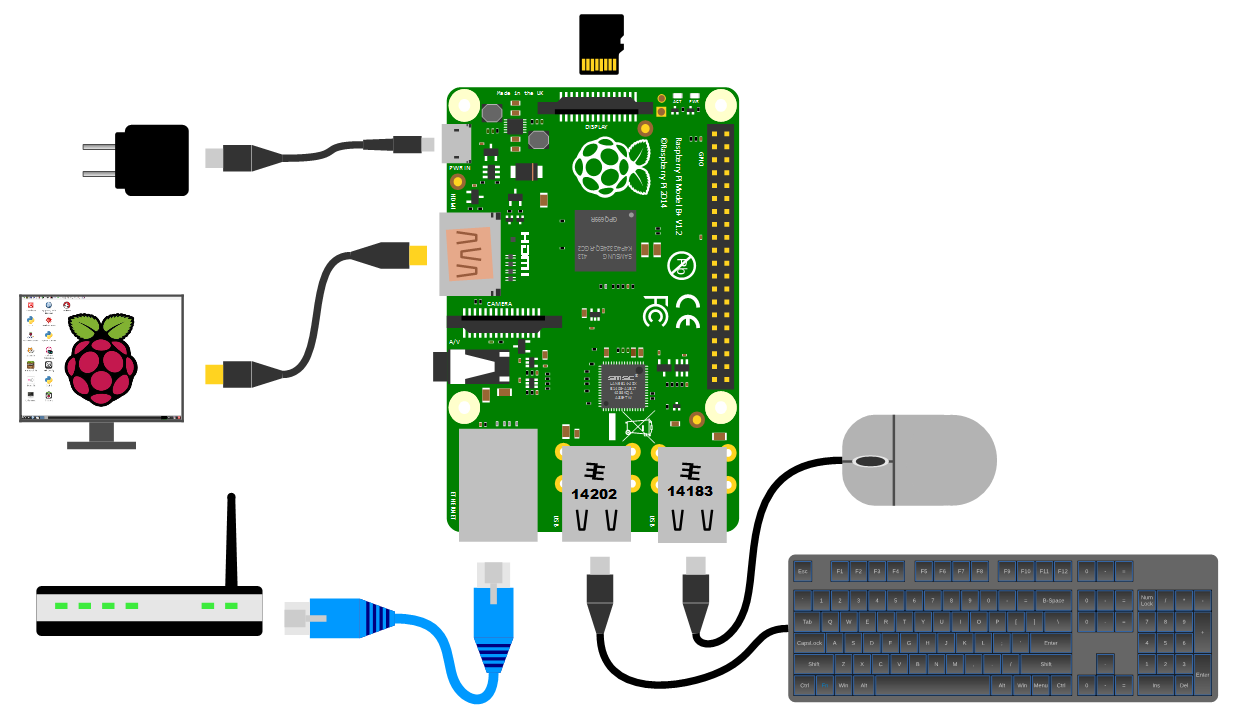
However, it’s worth thinking about the application that we use our Pi for. Depending on how much we ask of the unit, we might want to pay attention to the amount of current that our power supply can deliver. The A+, B+ and Zero models will function adequately with a 700mA supply, but the highr B models will draw more current and if we want to use multiple wireless devices or supplying sensors that demand increased power, we will need to consider a supply that is capable of an output up to 2.5A.
Cases
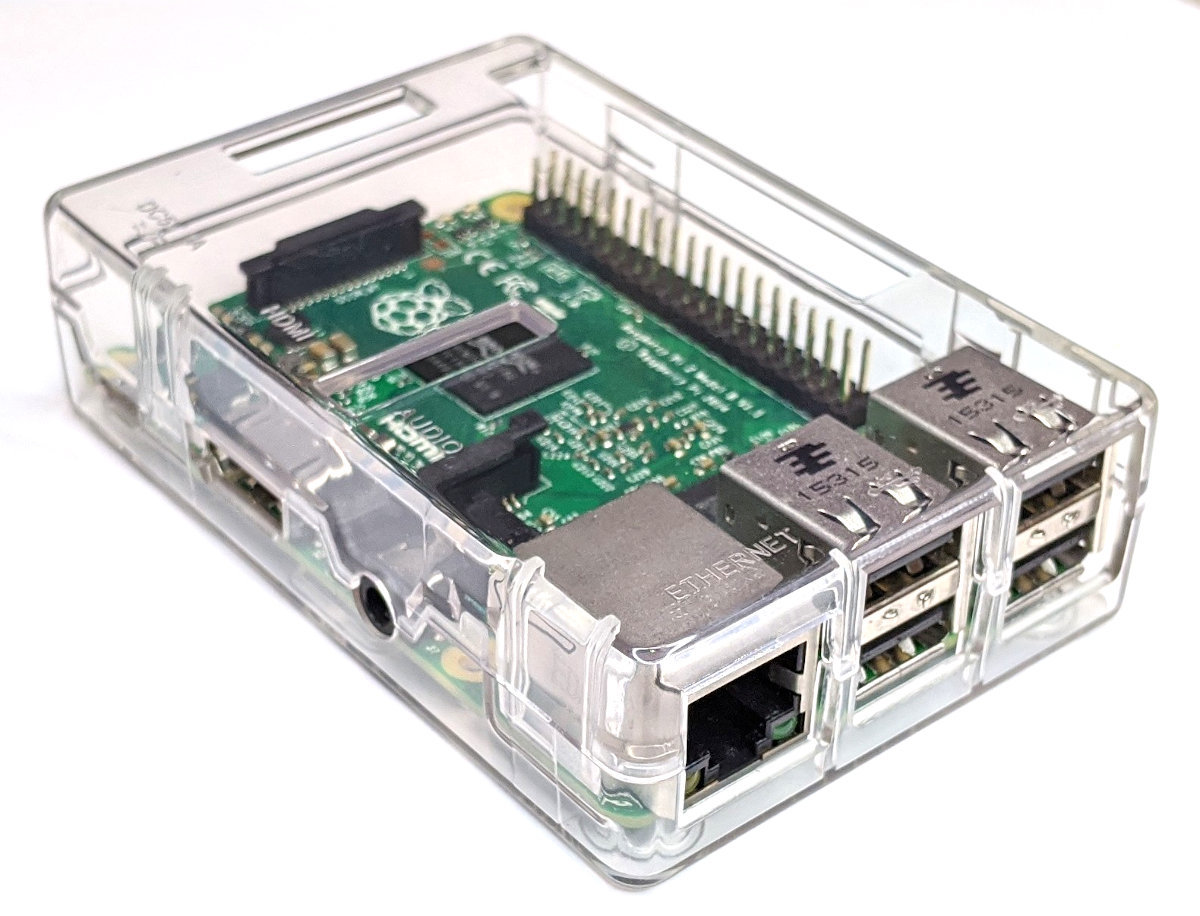
We should get ourselves a simple case to keep the Pi reasonably secure. There are a wide range of options to select from. These range from cheap but effective to more costly than the Pi itself (not hard) and looking fancy.
You could use a simple plastic case that can be brought for a few dollars;
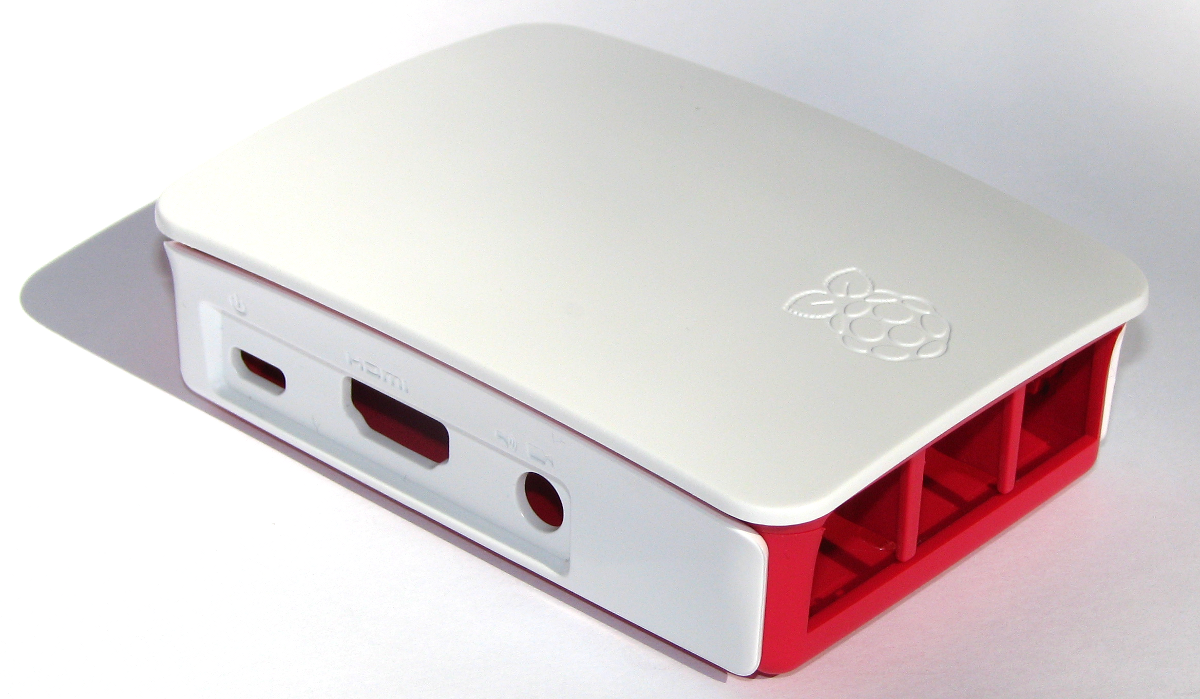
For a very practical design and a warm glow from knowing that you’re supporting a worthy cause, you could go no further than the official Raspberry Pi case that includes removable side-plates and loads of different types of access. All for the paltry sum of about $9.
Operating Systems
An operating system is software that manages computer hardware and software resources for computer applications. For example Microsoft Windows could be the operating system that will allow the browser application Firefox to run on our desktop computer.
Variations on the Linux operating system are the most popular on our Raspberry Pi. Often they are designed to work in different ways depending on the function of the computer.
Linux is a computer operating system that can be distributed as free and open-source software. The defining component of Linux is the Linux kernel which was first released on 5 October 1991 by Linus Torvalds.
Linux was originally developed as a free operating system for Intel x86-based personal computers. It has since been made available to a wide range of computer hardware platforms and is one of the most popular operating systems on servers, mainframe computers and supercomputers. Linux also runs on embedded systems, which are devices whose operating system is typically built into the firmware and is highly tailored to the system; this includes mobile phones, tablet computers, network routers, facility automation controls, televisions and video game consoles. Android, the most widely used operating system for tablets and smart-phones, is built on top of the Linux kernel. In our case we will be using a version of Linux that is assembled to run on the ARM CPU architecture used in the Raspberry Pi.
The development of Linux is one of the most prominent examples of free and open-source software collaboration. Typically, Linux is packaged in a form known as a Linux ‘distribution’, for both desktop and server use. Popular mainstream Linux distributions include Debian, Ubuntu and the commercial Red Hat Enterprise Linux. Linux distributions include the Linux kernel, supporting utilities and libraries and usually a large amount of application software to carry out the distribution’s intended use.
A distribution intended to run as a server may omit all graphical desktop environments from the standard install, and instead include other software to set up and operate a solution ‘stack’ such as LAMP (Linux, Apache, MySQL and PHP). Because Linux is freely re-distributable, anyone may create a distribution for any intended use.
Welcome to Raspberry Pi OS
The Raspberry Pi OS Linux distribution is based on Debian Linux. This is the official operating system for the Raspberry Pi.
Raspberry Pi OS and Raspbian
Up until the end of May 2020 the official operating system was called ‘Raspbian’ and there will be many references to Raspbian in online and print media. With the advent of an evolution to a 64 bit architecture, the maintainers of the Raspbian code (which is 32 bit) didn’t want to have the confusion of the new 64 bit version being called Raspbian when it didn’t actually contain any of their code. So the Raspberry Pi Foundation took the opportunity to opt for a name change to simplify future operating system releases by changing the name of the official Raspberry Pi operating system to ‘Raspberry Pi OS’. The 32 bit version of Raspberry Pi OS will no doubt continue to draw from the Raspbian project, but the 64 bit version will be all new code.
Operating System Evolution
At the time of writing there have been four different operating system releases published based on the Debian Linux distribution. Those four releases are called ‘Wheezy’, ‘Jessie’, ‘Stretch’ and ‘Buster’. Debian is a widely used Linux distribution that allows Raspberry Pi OS users to leverage a huge quantity of community based experience in using and configuring software. The Wheezy edition is the earlier of the three and was the stock edition from the inception of the Raspberry Pi till the end of 2015. From that point Jessie was the default distribution until mid 2017 when Stretch took over. Stretch’s reign came to a close in June 2019 with the release of the Raspberry Pi 4 and Buster.
Downloading
The best place to source the latest version of the Raspberry Pi OS is to go to the raspberrypi.org page; http://www.raspberrypi.org/downloads/. We will download the ‘Lite’ version (which doesn’t use a desktop GUI). If you’ve never used a command line environment, then good news! You’re about to enter the World of ‘real’ computer users :-).
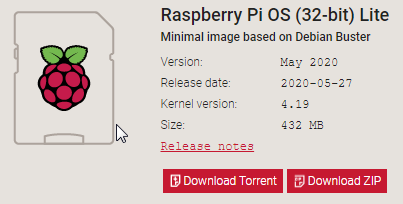
You can download via bit torrent or directly as a zip file, but whatever the method you should eventually be left with an ‘img’ file for Raspberry Pi OS.
To ensure that the projects we work on can be used with either the B+, B2, B3 or B4 models we need to make sure that the version of Raspberry Pi OS we download is from 2015-01-13 or later. Earlier downloads will not support the more modern CPU of the B2, B3 or B4. To support the newer CPU of the B3+ and later (and all the previous CPUs) we will need a version of Raspberry Pi OS from 2018-03-13 or later.
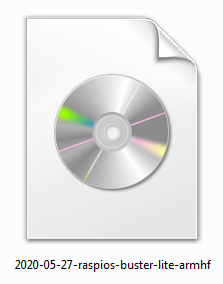
We should always try to download our image files from the authoritative source!
Writing the Operating System image to the SD Card
Once we have an image file we need to get it onto our SD card.
We will work through an example using Windows 7 but the process should be very similar for other operating systems as we will be using the excellent open source software Etcher which is available for Windows, Linux and macOS.
Download and install Etcher and start it up.
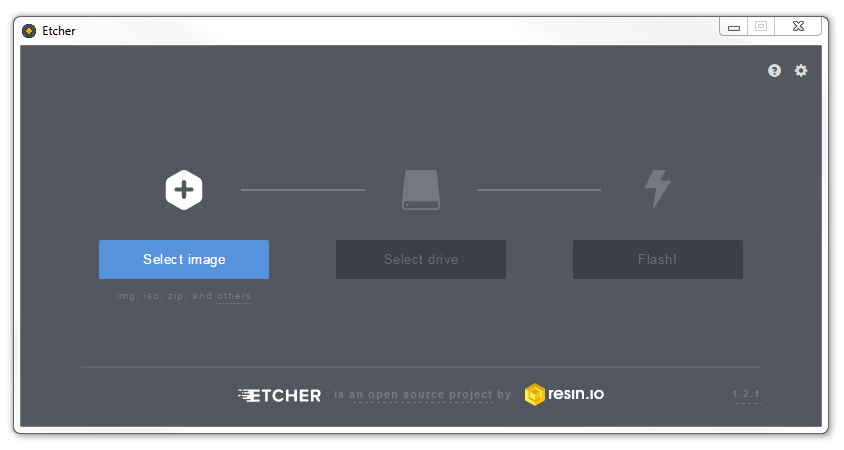
Select the img file that you want to install.
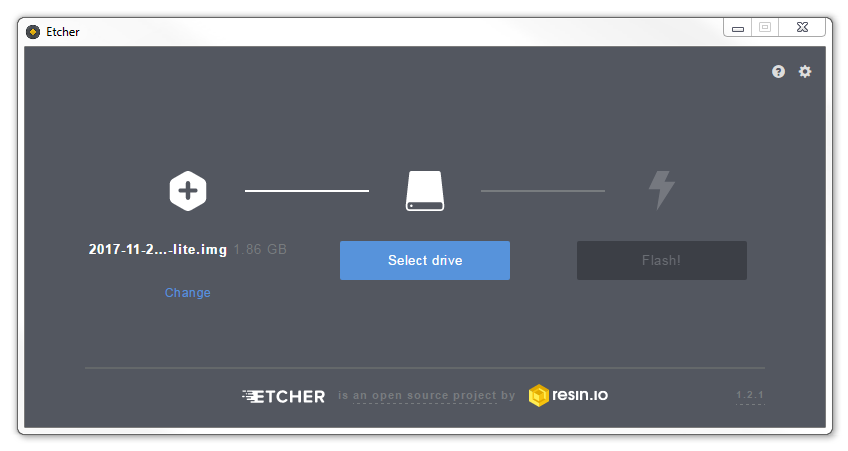
You will need an SD card reader capable of accepting your MicroSD card (you may require an adapter or have a reader built into your desktop or laptop). Place the card in the reader and you should see Etcher automatically select it for writing (Etcher is very good at presenting options for installing that are only SD cards).
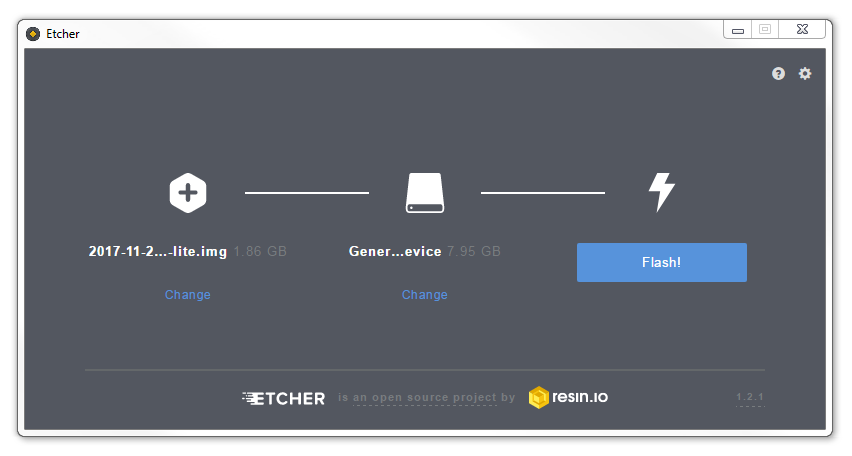
Then click on ‘Flash!’ to burn the card.
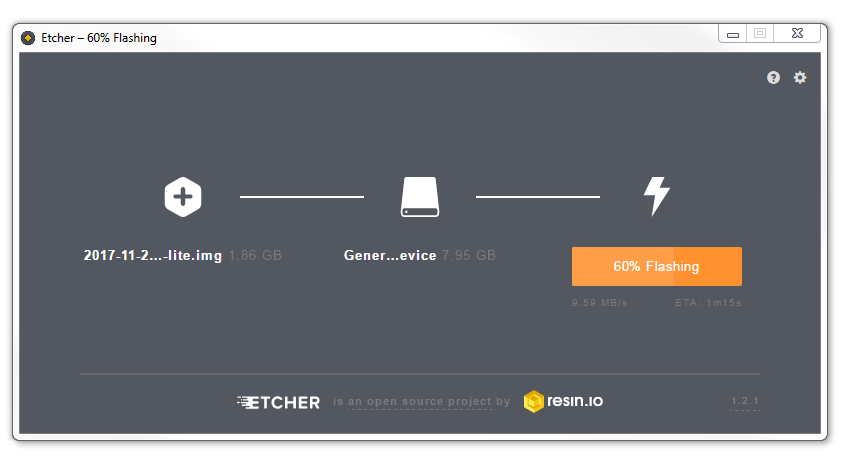
Etcher will write the image to the SD card. The time taken can vary a little, but it should only take about 3-4 minutes with a class 10 SD card.
Once written, Etcher will validate the write process (this can be disabled if desired).
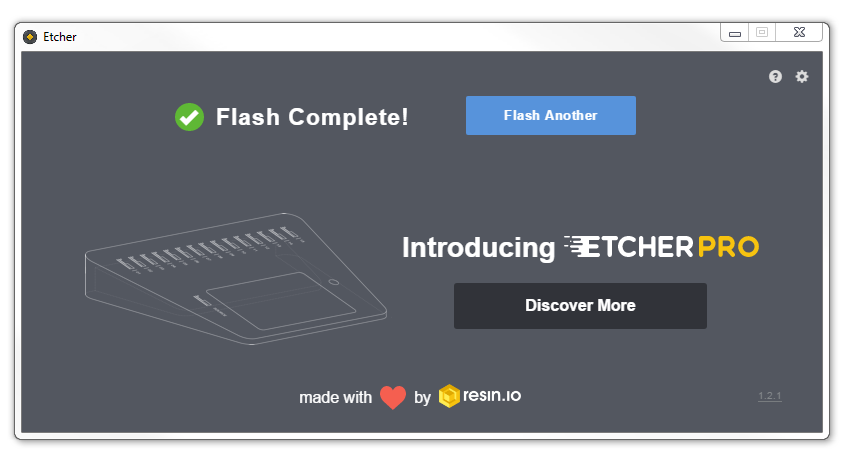
When the process is finished Etcher will automatically unmount the SD card.
Enabling Secure Shell Access
One of the awesome things when learning to use a Raspberry Pi comes when you begin to access it remotely from another computer. This is a bit of an ‘Ah Ha!’ moment for some people as they begin to appreciate just how networks and the Internet is built. We are going to enable and use remote access via what is called ‘SSH’. We’ll start using it later in the book, but for now we can take the opportunity to enable it for later use. We do this by creating a file called ‘ssh’ on our freshly written SD card. Then, when the Pi then boots up it sees the file and automatically knows to enable SSH.
SSH used to be enabled by default, but doing so presents a potential security concern, so it has been disabled by default as of the end of 2016. In our case it’s a feature that we want to use.
Eject the card from the computer and then re-insert it. When the computer recognises the card, open it and right-click in the folder to create a new file. This can be a simple txt file so long as the file prefix is ‘ssh’. It doesn’t need to have anything in it, there just needs to be a file there.
Now we can unmount the SD card and eject it again.
Powering On
Insert the card into the slot on the Raspberry Pi and turn on the power.
You will see a range of information scrolling up the screen before eventually being presented with a login prompt.
The Command Line interface
Because we have installed the ‘Lite’ version of Raspberry Pi OS, when we first boot up, the process should automatically re-size the root file system to make full use of the space available on your SD card. If this isn’t the case, the facility to do it can be accessed from the Raspberry Pi configuration tool (raspi-config) that we will look at in a moment.
Once the reboot is complete (if it occurs) you will be presented with the console prompt to log on;
The default username and password is:
Username: pi
Password: raspberry
Enter the username and password.
Congratulations, you have a working Raspberry Pi and are ready to start getting into the thick of things!
Firstly we’ll do a bit of house keeping.
Raspberry Pi Software Configuration Tool
We will use the Raspberry Pi Software Configuration Tool to change the locale and keyboard configuration to suit us. This can be done by running the following command;
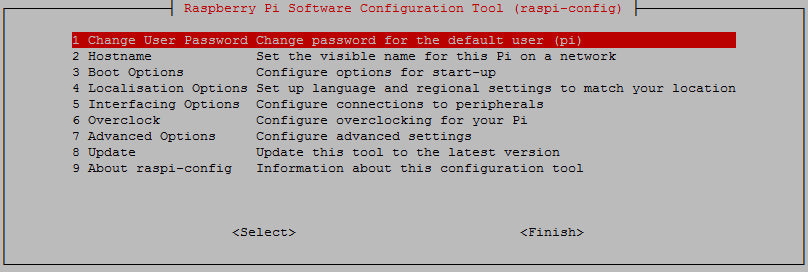
Use the up and down arrow keys to move the highlighted section to the selection you want to make then press tab to highlight the <Select> option (or <Finish> if you’ve finished).
Lets change the settings for our operating system to reflect our location for the purposes of having the correct time, language and WiFi regulations. These can all be located via selection ‘4 Localisation Options’ on the main menu.
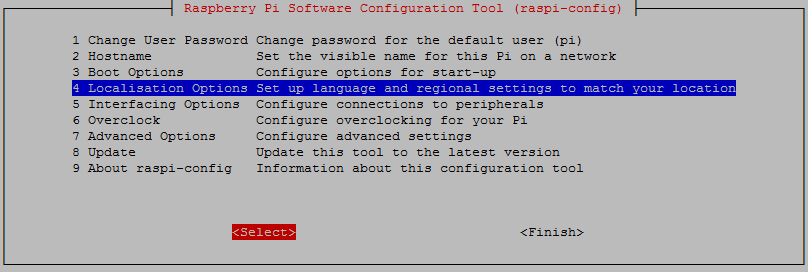
Select this and work through any changes that are required for your installation based on geography.
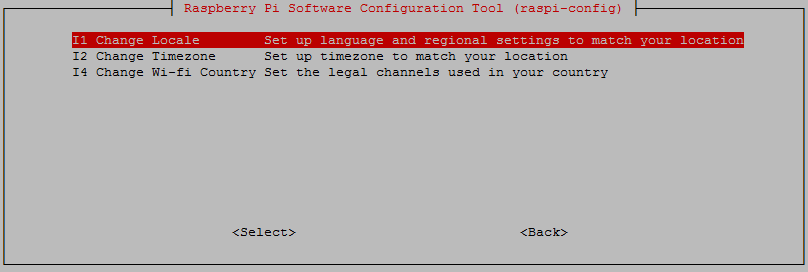
Once you exit out of the raspi-config menu system, if you have made a few changes, there is a probability that you will be asked if you want to re-boot the Pi. That’s a pretty good idea.
Once the reboot is complete you will be presented with the console prompt to log on again;
Software Updates
After configuring our Pi we’ll want to make sure that we have the latest software for our system. This is a useful thing to do as it allows any additional improvements to the software we will be using to be enhanced or security of the operating system to be improved. This is probably a good time to mention that we will need to have an Internet connection available.
Type in the following line which will find the latest lists of available software;
You should see a list of text scroll up while the Pi is downloading the latest information.
Then we want to upgrade our software to latest versions from those lists using;
The Pi should tell you the lists of packages that it has identified as suitable for an upgrade along with the amount of data that will be downloaded and the space that will be used on the system. It will then ask you to confirm that you want to go ahead. Tell it ‘Y’ and we will see another list of details as it heads off downloading software and installing it.
Power Up the Pi
To configure the Raspberry Pi for our purpose we will extend our Pi a little. This makes configuring and using the device easier and to be perfectly honest, making life hard for ourselves is so exhausting! Let’s not do that.
Static IP Address
As we mentioned earlier, enabling remote access is a really useful thing. This will allow us to configure and operate our raspberry Pi from a separate computer. To do so we will want to assign our Raspberry Pi a static IP address.
An Internet Protocol address (IP address) is a numerical label assigned to each device (e.g., computer, printer) participating in a computer network that uses the Internet Protocol for communication.
There is a strong likelihood that our Raspberry Pi already has an IP address and it should appear a few lines above the ‘login’ prompt when you first boot up;
The My IP address... part should appear just above or around 15 lines above the login line, depending on the version of Raspbian we’re using. In this example the IP address 10.1.1.25 belongs to the Raspberry Pi.
This address will probably be a ‘dynamic’ IP address and could change each time the Pi is booted. For the purposes of using the Raspberry Pi with a degree of certainty when logging in to it remotely it’s easier to set a fixed IP address.
This description of setting up a static IP address makes the assumption that we have a device running on our network that is assigning IP addresses as required. This sounds complicated, but in fact it is a very common service to be running on even a small home network and most likely on a modem/router or similar. This function is run as a service called DHCP (Dynamic Host Configuration Protocol). You will need to have access to this device for the purposes of knowing what the allowable ranges are for a static IP address.
The Netmask
A common feature for home modems and routers that run DHCP devices is to allow the user to set up the range of allowable network addresses that can exist on the network. At a higher level we should be able to set a ‘netmask’ which will do the job for us. A netmask looks similar to an IP address, but it allows you to specify the range of addresses for ‘hosts’ (in our case computers) that can be connected to the network.
A very common netmask is 255.255.255.0 which means that the network in question can have any one of the combinations where the final number in the IP address varies. In other words with a netmask of 255.255.255.0, the IP addresses available for devices on the network ‘10.1.1.x’ range from 10.1.1.0 to 10.1.1.255 or in other words any one of 256 unique addresses.
CIDR Notation
An alternative to specifying a netmask in the format of ‘255.255.255.0’ is to use a system called Classless Inter-Domain Routing, or CIDR. The idea is to add a specification in the IP address itself that indicates the number of significant bits that make up the netmask.
For example, we could designate the IP address 10.1.1.160 to be associated with the netmask 255.255.255.0 by using the CIDR notation of 10.1.1.160/24. This means that the first 24 bits of the IP address given are considered significant for the network routing.
Using CIDR notation allows us to do some very clever things to organise our network, but at the same time it can have the effect of confusing people by introducing a pretty complex topic when all they want to do is get their network going :-). So for the sake of this explanation we can assume that if we wanted to specify an IP address and a netmask, it could be accomplished by either specifying each separately (IP address = 10.1.1.160 and netmask = 255.255.255.0) or in CIDR format (10.1.1.160/24)
Distinguish Dynamic from Static
The other service that our DHCP server will allow is the setting of a range of addresses that can be assigned dynamically. In other words we will be able to declare that the range from 10.1.1.20 to 10.1.1.255 can be dynamically assigned which leaves 10.1.1.0 to 10.1.1.19 which can be set as static addresses.
You might also be able to reserve an IP address on your modem / router. To do this you will need to know what the MAC (or hardware address) of the Raspberry Pi is. To find the hardware address on the Raspberry Pi type;
(For more information on the ifconfig command check out the Linux commands section)
This will produce an output which will look a little like the following;
The figures 00:08:C7:1B:8C:02 are the Hardware or MAC address.
Because there are a huge range of different DHCP servers being run on different home networks, I will have to leave you with those descriptions and the advice to consult your devices manual to help you find an IP address that can be assigned as a static address. Make sure that the assigned number has not already been taken by another device. In a perfect World we would hold a list of any devices which have static addresses so that our Pi’s address does not clash with any other device.
For the sake of the upcoming projects we will assume that the address 10.1.1.160 is available.
Default Gateway
Before we start configuring we will need to find out what the default gateway is for our network. A default gateway is an IP address that a device (typically a router) will use when it is asked to go to an address that it doesn’t immediately recognise. This would most commonly occur when a computer on a home network wants to contact a computer on the Internet. The default gateway is therefore typically the address of the modem / router on your home network.
We can check to find out what our default gateway is from Windows by going to the command prompt (Start > Accessories > Command Prompt) and typing;
This should present a range of information including a section that looks a little like the following;
The default router gateway is therefore ‘10.1.1.1’.
Lets edit the dhcpcd.conf file
On the Raspberry Pi at the command line we are going to start up a text editor and edit the file that holds the configuration details for the network connections.
The file is /etc/dhcpcd.conf. That is to say it’s the dhcpcd.conf file which is in the etc directory which is in the root (/) directory.
To edit this file we are going to type in the following command;
The nano file editor will start and show the contents of the dhcpcd.conf file which should look a little like the following;
for dhcpcd.
# See dhcpcd.conf(5) for details.
# Allow users of this group to interact with dhcpcd via the control socket.
#controlgroup wheel
# Inform the DHCP server of our hostname for DDNS.
hostname
# Use the hardware address of the interface for the Client ID.
clientid
# or
# Use the same DUID + IAID as set in DHCPv6 for DHCPv4 ClientID per RFC4361.
#duid
# Persist interface configuration when dhcpcd exits.
persistent
# Rapid commit support.
# Safe to enable by default because it requires the equivalent option set
# on the server to actually work.
option rapid_commit
# A list of options to request from the DHCP server.
option domain_name_servers, domain_name, domain_search, host_name
option classless_static_routes
# Most distributions have NTP support.
option ntp_servers
# Respect the network MTU. This is applied to DHCP routes.
option interface_mtu
# A ServerID is required by RFC2131.
require dhcp_server_identifier
# Generate Stable Private IPv6 Addresses instead of hardware based ones
slaac private
# Example static IP configuration:
#interface eth0
#static ip_address=192.168.0.10/24
#static ip6_address=fd51:42f8:caae:d92e::ff/64
#static routers=192.168.0.1
#static domain_name_servers=192.168.0.1 8.8.8.8 fd51:42f8:caae:d92e::1
# It is possible to fall back to a static IP if DHCP fails:
# define static profile
#profile static_eth0
#static ip_address=192.168.1.23/24
#static routers=192.168.1.1
#static domain_name_servers=192.168.1.1
# fallback to static profile on eth0
#interface eth0
#fallback static_eth0
The file actually contains some commented out sections that provide guidance on entering the correct configuration.
We are going to add the information that tells the network interface to use eth0 at our static address that we decided on earlier (10.1.1.160) along with information on the netmask to use (in CIDR format) and the default gateway of our router. To do this we will add the following lines to the end of the information in the dhcpcd.conf file;
Here we can see the IP address and netmask (static ip_address=10.1.1.160/24), the gateway address for our router (static routers=10.1.1.1) and the address where the computer can also find DNS information (static domain_name_servers=10.1.1.1).
Once you have finished press ctrl-x to tell nano you’re finished and it will prompt you to confirm saving the file. Check your changes over and then press ‘y’ to save the file (if it’s correct). It will then prompt you for the file-name to save the file as. Press return to accept the default of the current name and you’re done!
To allow the changes to become operative we can type in;
This will reboot the Raspberry Pi and we should see the (by now familiar) scroll of text and when it finishes rebooting you should see;
Which tells us that the changes have been successful (bearing in mind that the IP address above should be the one you have chosen, not necessarily the one we have been using as an example).
Remote access
To allow us to work on our Raspberry Pi from our normal desktop we can give ourselves the ability to connect to the Pi from another computer. The will mean that we don’t need to have the keyboard / mouse or video connected to the Raspberry Pi and we can physically place it somewhere else and still work on it without problem. This process is called ‘remotely accessing’ our computer.
To do this we need to install an application on our windows desktop which will act as a ‘client’ in the process and have software on our Raspberry Pi to act as the ‘server’. There are a couple of different ways that we can accomplish this task, but because we will be working at the command line (where all we do is type in our commands (like when we first log into the Pi)) we will use what’s called SSH access in a ‘shell’.
Remote access via SSH
Secure Shell (SSH) is a network protocol that allows secure data communication, remote command-line login, remote command execution, and other secure network services between two networked computers. It connects, via a secure channel over an insecure network, a server and a client running SSH server and SSH client programs, respectively (there’s the client-server model again).
In our case the SSH program on the server is running sshd and on the Windows machine we will use a program called ‘PuTTY’.
Setting up the Server (Raspberry Pi)
SSH is already installed and operating but to check that it is there and working type the following from the command line;
The Pi should respond with the message that the program sshd is active (running).
(/lib/systemd/system/ssh.service; enabled)
Active: active (running) since Tue 2017-04-25 03:30:16 UTC; 1h 28min ago
Main PID: 2135 (sshd)
CGroup: /system.slice/ssh.service
└─2135 /usr/sbin/sshd -D
If it isn’t, run the following command;

Use the up and down arrow keys to move the highlighted section to the selection you want to make then press tab to highlight the <Select> option (or <Finish> if you’ve finished).
To enable SSH select ‘5 Interfacing Options’ from the main menu.
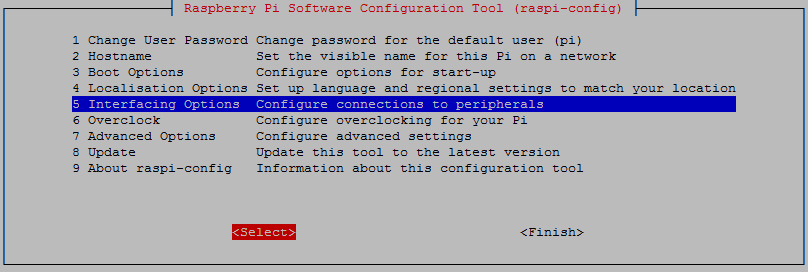
From here we select ‘P2 SSH’

And we should be done!
Setting up the Client (Windows)
The client software we will use is called ‘Putty’. It is open source and available for download from here.
On the download page there are a range of options available for use. The best option for us is most likely under the ‘For Windows on Intel x86’ heading and we should just download the ‘putty.exe’ program.
Save the file somewhere logical as it is a stand-alone program that will run when you double click on it (you can make life easier by placing a short-cut on the desktop).
Once we have the file saved, run the program by double clicking on it and it will start without problem.
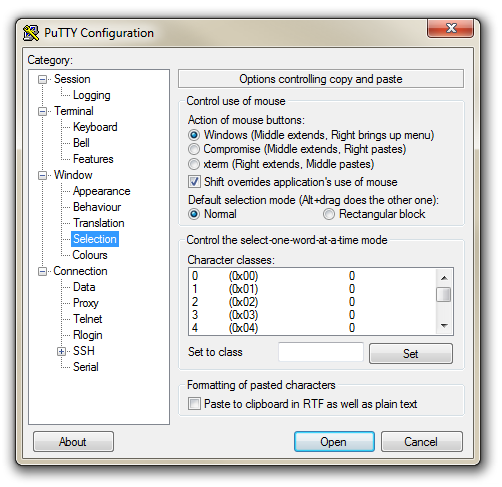
The first thing we will set-up for our connection is the way that the program recognises how the mouse works. In the ‘Window’ Category on the left of the PuTTY Configuration box, click on the ‘Selection’ option. On this page we want to change the ‘Action of mouse’ option from the default of ‘Compromise (Middle extends, Right paste)’ to ‘Windows (Middle extends, Right brings up menu)’. This keeps the standard Windows mouse actions the same when you use PuTTY.
Now select the ‘Session’ Category on the left hand menu. Here we want to enter our static IP address that we set up earlier (10.1.1.160 in the example that we have been following, but use your one) and because we would like to access this connection on a frequent basis we can enter a name for it as a saved session (In the screen-shot below it is imaginatively called ‘Raspberry Pi’). Then click on ‘Save’.
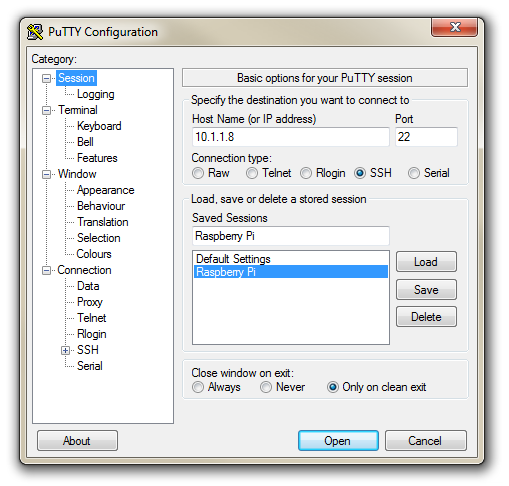
Now we can select our raspberry Pi Session (per the screen-shot above) and click on the ‘Open’ button.
The first thing you will be greeted with is a window asking if you trust the host that you’re trying to connect to.
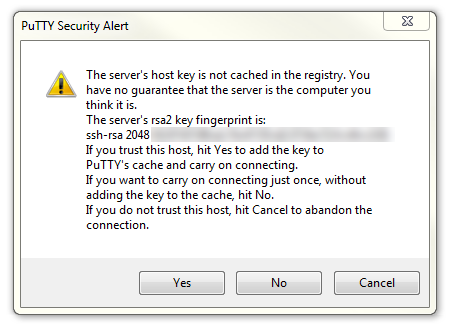
In this case it is a pretty safe bet to click on the ‘Yes’ button to confirm that we know and trust the connection.
Once this is done, a new terminal window will be shown with a prompt to login as: . Here we can enter our user name (‘pi’) and then our password (if it’s still the default, the password is ‘raspberry’).
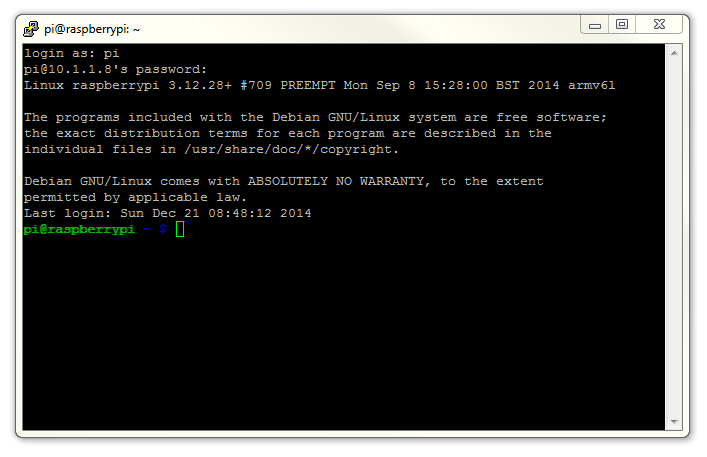
There you have it. A command line connection via SSH. Well done.
If this is the first time that you’ve done something like this it can be a very liberating feeling. To complete the feeling of freedom let’s set up a wireless network connection.
WinSCP
To make the process of transferring files from Windows easier I would recommend looking to the program WinSCP.
This provides a very intuitive way to copy files between your desktop and the Pi.
Download and install the program. Once installed, click on the desktop icon.
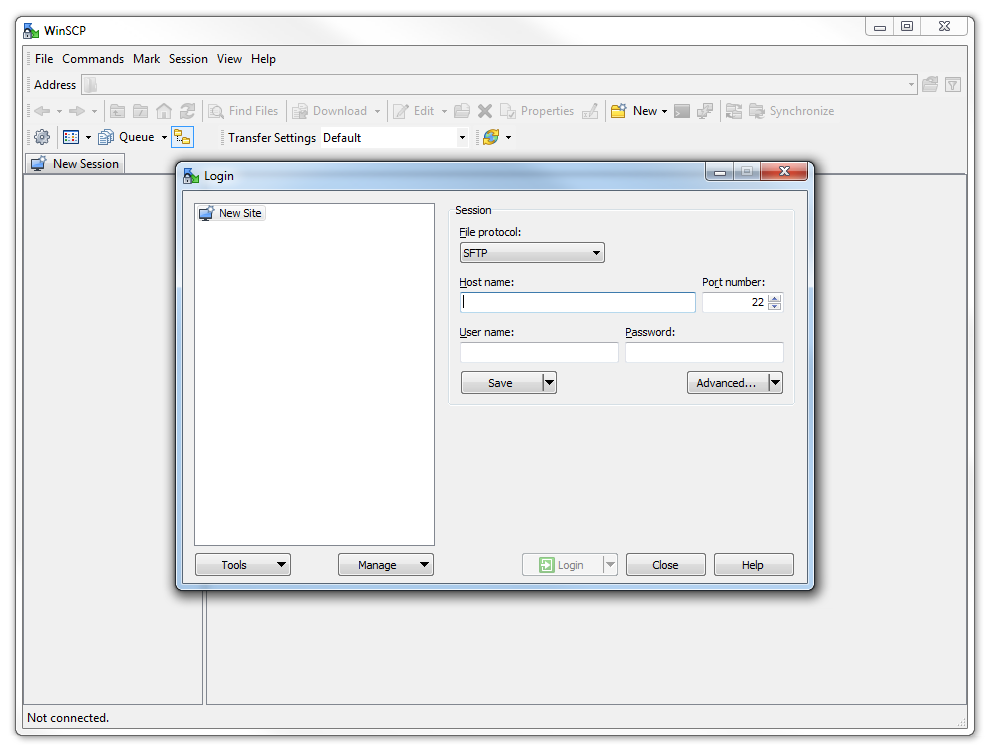
The program opens with default login page. Enter the ‘Host name’ field with the IP address of the Pi. Also put in the username and password of the Pi.
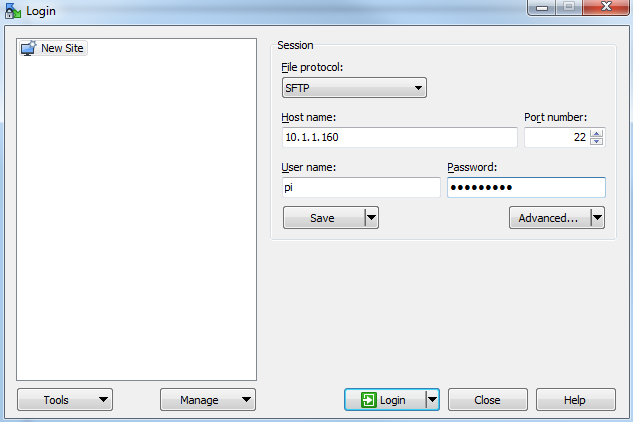
Click on ‘Save’ to save the login details for ease of future access.
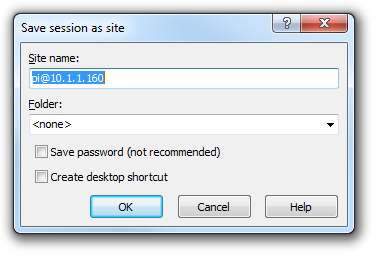
Enter the ‘Site name’ as a name of the Pi or leave it as the default, with the user and IP address. Check the ‘Save password’ for a convenient but insecure way to avoid typing in the username and password in the future. Then press OK
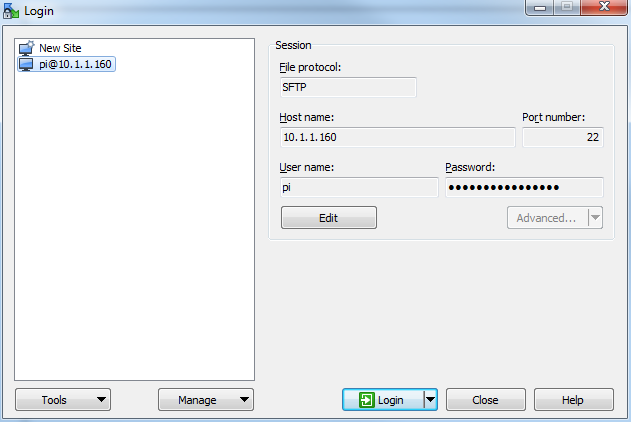
The saved login details now appear on the left hand pane. Click on ‘Login’ to log in to the Pi.
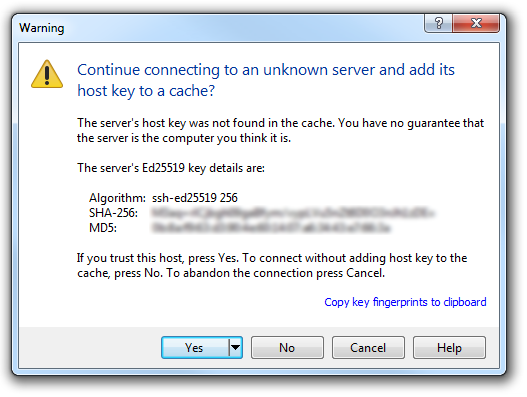
We will receive a warning about connecting to an unknown server for the first time. Assuming that we are comfortable doing this (i.e. that we know that we are connecting the Pi correctly) we can click on ‘Yes’.
There is a possibility that it might fail on its first attempt, but tell it to reconnect if it does and we should be in!
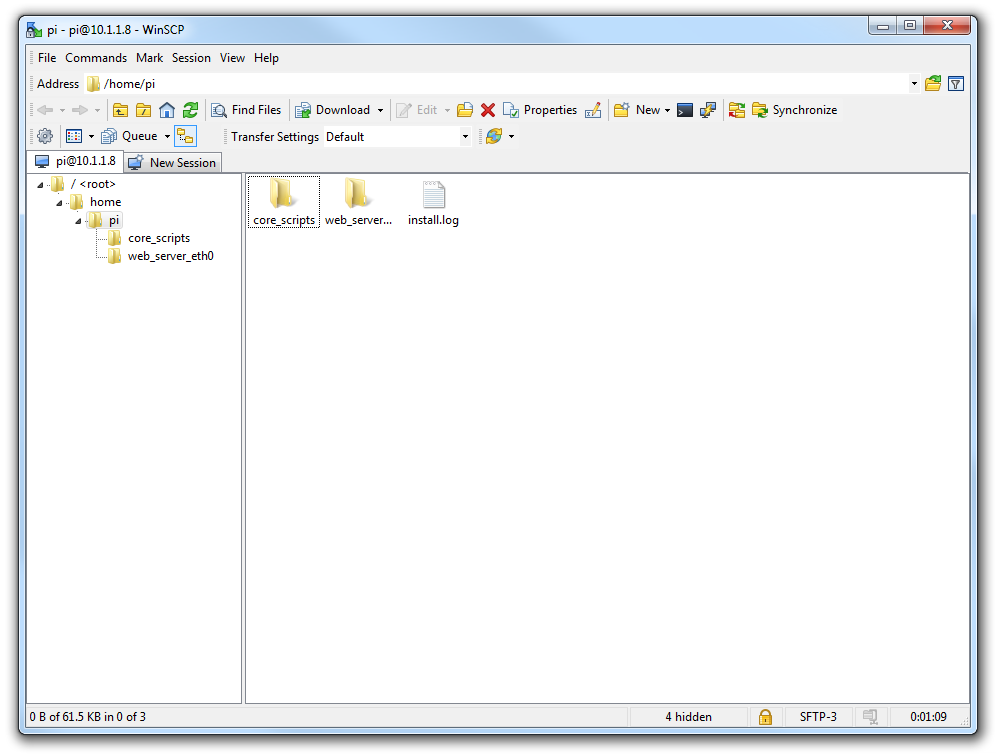
Here we can see a familiar tree structure for file management and we have the ability to copy files via dragging and dropping them into place.
Assuming that we already have PuTTY installed we should be able to click on the ‘Open Session in PuTTY’ icon and we will get access to the command line.

Setting up a WiFi Network Connection
Our set-up of the Raspberry Pi will allow us to carry out all the (computer interface) interactions via a remote connection. However, the Raspberry Pi is currently making that remote connection via a fixed network cable. It could be argued that the lower number of connections that we need to run to our machine the better. The most obvious solution to this conundrum is to enable a wireless connection.
It should be noted that enabling a wireless network will not be a requirement for everyone, and as such, I would only recommend it if you need to. If you’re using a model B3, B3+, B4 or Zero W you have WiFi built in, otherwise you will need to purchase a USB WiFi dongle and correctly configure it.
Built in WiFi Enabling
We need to edit the file wpa_supplicant.conf at /etc/wpa_supplicant/wpa_supplicant.conf. This looks like the following;
Use the nano command as follows;
We need to add the ssid (the wireless network name) and the password for the WiFi network here so that the file looks as follows (using your ssid and password of course);
Make the changes operative
To allow the changes to become operative we can type in;
Once we have rebooted, we can check the status of our network interfaces by typing in;
This will display the configuration for our wired Ethernet port, our ‘Local Loopback’ (which is a fancy way of saying a network connection for the machine that you’re using, that doesn’t require an actual network (ignore it in the mean time)) and the wlan0 connection which should look a little like this;
flags=4163<UP,BROADCAST,RUNNING,MULTICAST> mtu 1500
inet 10.1.1.99 netmask 255.255.255.0 broadcast 10.1.1.255
inet6 fe80::8b9f:3e4f:dcf0:12a9 prefixlen 64 scopeid 0x20<link>
ether b8:27:eb:e3:b7:f2 txqueuelen 1000 (Ethernet)
RX packets 51 bytes 9384 (9.1 KiB)
RX errors 0 dropped 0 overruns 0 frame 0
TX packets 35 bytes 6078 (5.9 KiB)
TX errors 0 dropped 0 overruns 0 carrier 0 collisions 0
This would indicate that our wireless connection has been assigned the dynamic IP address 10.1.1.99.
We should be able to test our connection by connecting to the Pi via SSH and ‘PuTTY’ on the Windows desktop using the address 10.1.1.99.
In theory you are now the proud owner of a computer that can be operated entirely separate from all connections except power!
Make the built in WiFi IP address static
In the same way that we would edit the /etc/dhcpcd.conf file to set up a static IP address for our physical connection (eth0) we can set our WiFi connection to a static address as well. Start by editing it with the command…
This time we will add the details for the wlan0 connection to the end of the file. Those details (assuming we will use the 10.1.1.161 IP address) should look like the following;
Our wireless lan (wlan0) is now designated to be a static IP address (with the details that we had previously assigned to our wired connection) and we have added the ‘ssid’ (the network name) of the network that we are going to connect to and the password for the network.
Make the changes operative
To allow the changes to become operative we can type in;
We’re done!
Reconnecting to the wireless network automatically
I have found with experience that in spite of my best intentions, sometimes when setting up a Raspberry Pi to maintain a WiFi connection, if it disconnects for whatever reason it may not reconnect automatically.
To solve this problem we’re going to write a short script that automatically reconnects our Pi to a WiFi network. The script will check to see if the Pi is connected to our local network and, if it’s off-line, will restart the wireless network interface. We’ll use a cron job to schedule the execution of this script at a regular interval.
Let’s write a script
First, we’ll need to check if the Pi is connected to the network. This is where we’ll try to ping an IP address on our local network (perhaps our gateway address?). If the ping command succeeds in getting a response from the IP address, we have network connectivity. If the command fails, we’ll turn off our wireless interface (wlan1) and then turn it back on (yes, the timeless solution of turning it off and on).
The script looks a little like this;
#!/bin/bash

# The IP address of our gateway on our local router
GATEWAY=10.1.1.1

# Send two pings, with the output going to /dev/null
ping -c2 ${GATEWAY} > /dev/null

# Check to see if the returned value from ping ($?)
# is not 0 and then act to restart wlan1 if necessary
if [ $? == 0 ]
then
    # Restart wlan1 (the wireless interface)
    ifconfig wlan1 down
    ifconfig wlan1 up
fi
Use nano to create the script, name it something like wifistart.sh, and save it in /usr/local/bin.
We also need to make sure it’s executable by running chmod (using sudo) as follows;
Lets run our script on a regular schedule
To make our WiFi checking script run automatically, we’ll schedule a cron job using crontab;
… and add this line to the bottom:
This runs the script every 5 minutes with sudo permissions, writing its output to /dev/null so it doesn’t spam syslog.
Let’s test it
To test that the script works as expected, we will want to take down the wlan1 interface and wait for the script to bring it back up. Before taking down wlan1, we might want to adjust the interval in crontab to 1 minute. And fair warning, when we disconnect wlan1, we will lose that network interface, so we will need to either have a local keyboard / monitor connected, have another network interface set up or be really confident that we’ve got everything set up right first time.
To take down wlan1 to confirm the script works, run:
After waiting for 5 (or 1) minutes, we could try ssh-ing back into the Raspberry Pi or if we’re keen we could have a ping command running on another server checking the interface to show when it stops and when it (hopefully) starts again. Assuming everything works, our Pi should reconnect seamlessly.
Setting up the Raspberry Pi Software
While the Raspberry Pi is a capable computer, we still need to install software on it to allow us to gather, store and present our data.
The software we will be using is based on the Linux Operating System. Because this is potentially unfamiliar territory (for those who haven’t used Linux or had some practical computing experience), we will take our time and explain things as we go.
Web Server, PHP and Database
Because we want to be able to present the data we will be collecting, we need to set up a web server that will return measurements to other computers that will be browsing within the network (remembering that this is not intended to be connected to the Internet, just inside your home network). This type of connection is called a RESTful service.
At the same time as setting up a web server on the Pi we will install PHP. PHP is a scripting language that is widely used in developing web pages. And because we will want to store our data somewhere we will add in the SQLite database. SQLite is a self-contained database engine that reads and writes directly to ordinary disk files. A complete SQL database is contained in a single file which can be transferred between platforms for backup or restoration purposes. SQLite is touted as the most widely used database engine in the world.
Install NGINX and PHP
The web server that we will use is called NGINX (pronounced “Engine X”). NGINX is an open-source web server that is often recommended for its performance and low resource consumption. This obviously makes it ideal for hardware such as the Raspberry Pi. In spite of being targeted as something of a ‘light’ application, it is extremely powerful, capable and it is widely used in large scale applications.
We can start the install process using the following;
We’re familiar with apt-get already, but this time we’re including more than one package in the installation process. Specifically we’re including nginx and php-fpm.
‘nginx’ is obviously the name of the NGINX web server and php-fpm is for PHP.
The Raspberry Pi will advise you of the range of additional packages that will be installed at the same time (to support those we’re installing (these additional packages are ‘dependencies’)). Agree to continue and the installation will proceed. This should take a few minutes or more (depending on the speed of your Internet connection).
Configuration
Firstly we should edit the default file that will get displayed as a web page if none is specified. What we want to do is to include the option to redirect to an index.php file.:
Replace the line:
with
Now we want to edit the portion of the file that will handle all requests for resources that end in .php.
Replace the section of the file that looks like this;
With this;
NGINX has its default web page location at /var/www/html on Raspbian. We are going to change the permissions / ownership of that folder by running following two commands:
This is necessary to let the ‘pi’ user edit the files in that location easily.
Now let’s create a suitable index.php test file with the following command:
Now lets restart the NGINX service so that the changes we have made can take effect:
Now we can go to to the IP address of our Pi in a browser (in the example we are using it’s 10.1.1.160) and type it in to the URL area to test. Something like the following should be displayed;
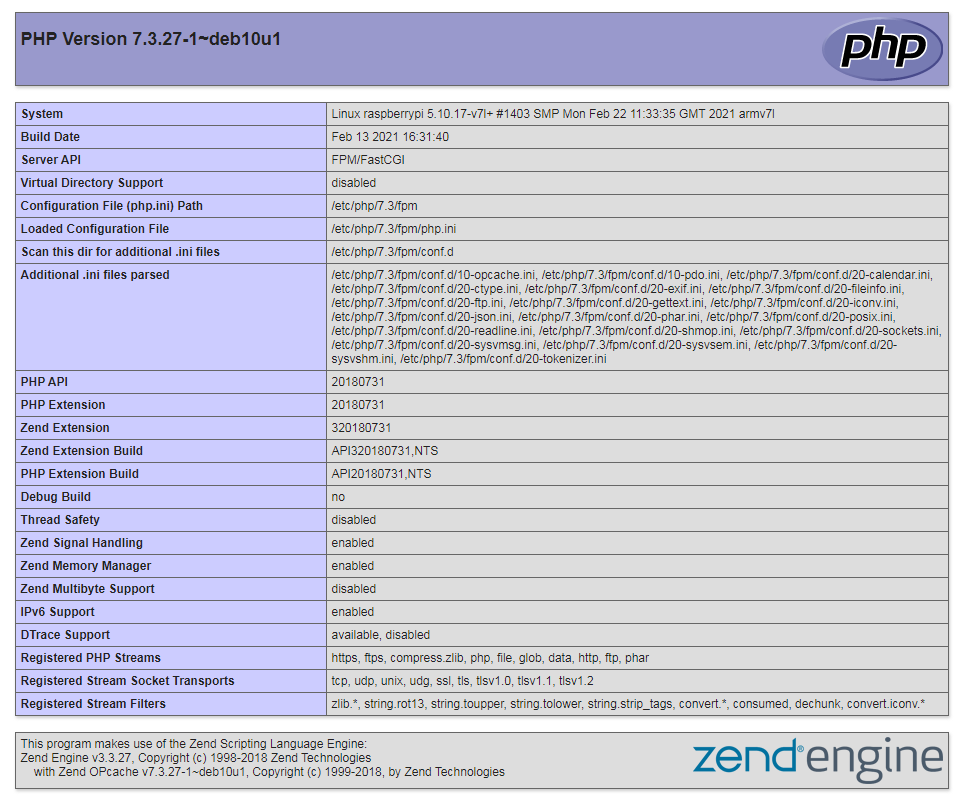
Marvellous.
Database
As mentioned earlier, we will use a SQLite database to store the information that we collect.
SQLite is incredibly easy to install. Hopefully you made a note of the version of PHP that we installed in our last set because we will use that version number to install the correct PHP SQLite driver.
And that’s it!
Because SQLite does not rely on a client-server relationship, applications that interact with the SQLite database read and write directly to the database file (or files). It therefore relies on the security of the permissions on the operating system to provide separation. This means that accessing the database from a separate computer is problematic, but it simplifies interaction for the user that is operating the database locally.
Create a database and a table
When we read data from our sensors, we will record them in a database. SQLite is a database program, but we still need to set up a database file that SQLite will read. In fact when we come to record and explore our data we will be dealing with a ‘table’ of data that will exist inside a database.
We will create a database called ‘measurements’ and in that database we will create a table called ‘temperature’ That table will record regular values from our temperature sensors and the time that they were taken.
Creating our database and initiating interaction with it is done as follows;
Once the program is started we are presented with a prompt for the database;
From this prompt we can begin to provide commands and when we are finished we can exit from SQLite by typing in .quit. At any stage if we forget what command we should be running we can type in .help and the program will give us a list of commands.
We will create a table called ‘temperature’ which will contain three pieces of data for each reading;
- The time in a date time group field called ‘dtg’.
- A temperature reading
- The unique ID of the sensor
We can think of these three things at the columns in our table. Each column in a database should have a ‘class’ designated for it that will allow the database to treat and manipulate the information most efficiently.
For the first column we can use the name ‘dtg’ (short for date time group) the ‘class’ as ‘TEXT’. Since SQLite doesn’t have a dedicated storage class set aside for dates and/or times this is the most convenient mechanism. We will do this in the format YYYY-MM-DD HH:MM:SS. For the second column we will use the name ‘temperature’ and the ‘class’ is ‘REAL’ (this is a floating point value). For the third column we will enter the name ‘sensor_id’ and the type is ‘TEXT’ again.
Enter each of the following lines at the sqlite> prompt. The semicolon represents the end of the command.
We can then confirm that the table exists using the command ‘.table’;
There we have it! A simple database and a table ready to go.
Multiple Temperature Measurements
This project will measure the temperature at multiple points using DS18B20 sensors. We will use the waterproof version of the sensors since they are more practical for external applications.
The DS18B20 Sensor
The DS18B20 is a ‘1-Wire’ digital temperature sensor manufactured by Maxim Integrated Products Inc. It provides a 9-bit to 12-bit precision, Celsius temperature measurement and incorporates an alarm function with user-programmable upper and lower trigger points.
Its temperature range is between -55C to 125C and they are accurate to +/- 0.5C between -10C and +85C.
It is called a ‘1-Wire’ device as it can operate over a single wire bus thanks to each sensor having a unique 64-bit serial code that can identify each device.
While the DS18B20 comes in a TO-92 package, it is also available in a waterproof, stainless steel package that is pre-wired and therefore slightly easier to use in conditions that require a degree of protection. The measurement project that we will undertake will use the waterproof version.
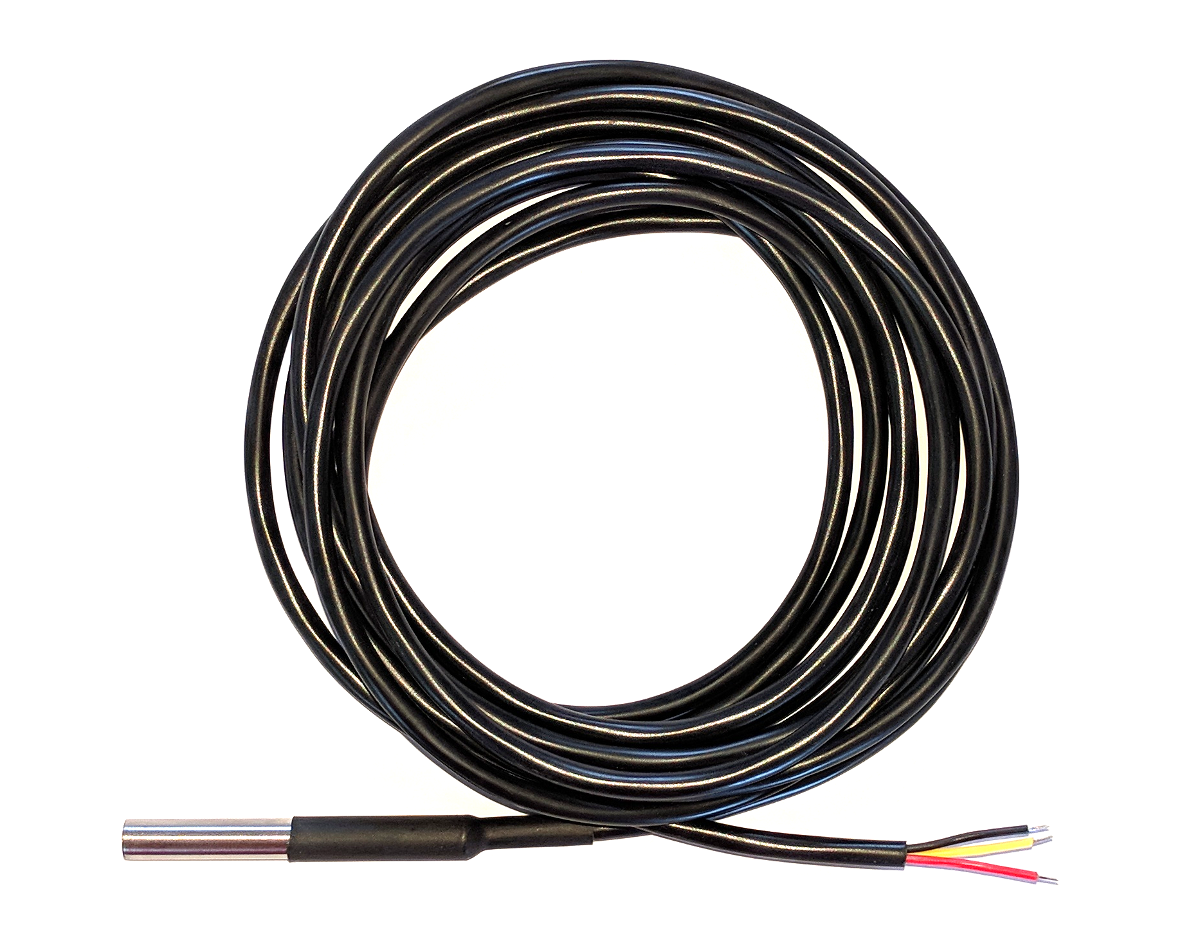
The sensors can come with a couple of different wire colour combinations. They will typically have a black wire that needs to be connected to ground. A red wire that should be connected to a voltage source (in our case a 3.3V pin from the Pi) and a blue or yellow wire that carries the signal.
The DS18B20 can be powered from the signal line, but in our project we will use an external voltage supply (from the Pi).
Measure
Hardware required
- 3 x DS18B20 sensors (the waterproof version)
- 10k Ohm resister
- Jumper cables with Dupont connectors on the end
- Solder
- Heat-shrink
Connect
The DS18B20 sensors needs to be connected with the black wires to ground, the red wires to the 3V3 pin and the blue or yellow (some sensors have blue and some have yellow) wires to the GPIO4 pin. A resistor between the value of 4.7k Ohms to 10k Ohms needs to be connected between the 3V3 and GPIO4 pins to act as a ‘pull-up’ resistor.
The Raspbian Operating System image that we are using only supports GPIO4 as a 1-Wire pin, so we need to ensure that this is the pin that we use for connecting our temperature sensor.
The following diagram is a simplified view of the connection.
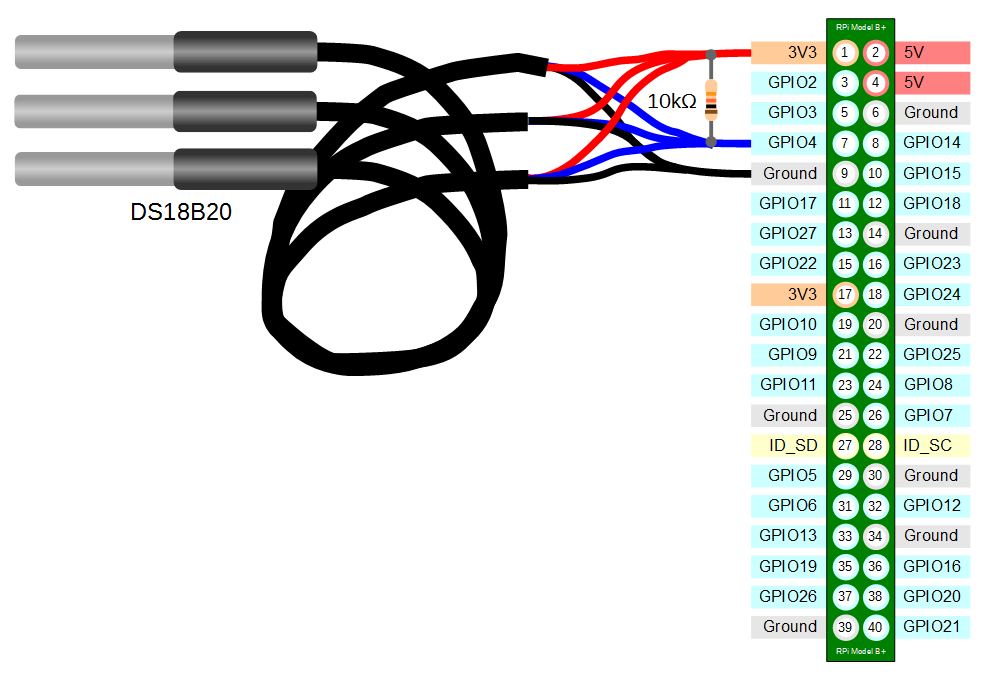
Connecting the sensor practically can be achieved in a number of ways. You could use a Pi Cobbler break out connector mounted on a bread board connected to the GPIO pins. But because the connection is relatively simple we could build a minimal configuration that will plug directly onto the appropriate GPIO pins using Dupont connectors. The resister is concealed under the heat-shrink and indicated with the arrow.

This version uses a recovered header connector from a computers internal USB cable.
Enable
We’re going to go back to the Raspberry Pi Software Configuration Tool as we need to enable the 1-wire option. This can be done by running the following command;
Select ‘Interfacing options`;

Then select the 1-wire option and enable it.

When you back out of the menu you will be asked to reboot the device. Do this and then log in again.
Test
From the terminal as the ‘pi’ user run the command;
modprobe w1-gpio registers the new sensors connected to GPIO4 so that now the Raspberry Pi knows that there is a 1-Wire device connected to the GPIO connector (For more information on the modprobe command check out the details here).
Then run the command;
modprobe w1-therm tells the Raspberry Pi to add the ability to measure temperature on the 1-Wire system.
To allow the w1_gpio and w1_therm modules to load automatically at boot we can edit the the /etc/modules file and include both modules there where they will be started when the Pi boots up. To do this edit the /etc/modules file;
Add in the w1_gpio and w1_therm modules so that the file looks like the following;
# /etc/modules: kernel modules to load at boot time.
#
# This file contains the names of kernel modules that should be loaded
# at boot time, one per line. Lines beginning with "#" are ignored.

w1-gpio
w1-therm
Save the file.
Then we change into the /sys/bus/w1/devices directory and list the contents using the following commands;
(For more information on the cd command check out the reference here. Or to find out more about the ls command go here)
This should list out the contents of the /sys/bus/w1/devices which should include a number of directories starting 28-. The number of directories should match the number of connected sensors. The portion of the name following the 28- is the unique serial number of each of the sensors.
We then change into one of those directories;
We are then going to view the ‘w1_slave’ file with the cat command using;
The output should look something like the following;
At the end of the first line we see a YES for a successful CRC check (CRC stands for Cyclic Redundancy Check, a good sign that things are going well). If we get a response like NO or FALSE or ERROR, it will be an indication that there is some kind of problem that needs addressing. Check the circuit connections and start troubleshooting.
At the end of the second line we can now find the current temperature. The t=23187 is an indication that the temperature is 23.187 degrees Celsius (we need to divide the reported value by 1000).
cd into each of the 28-xxxx directories in turn and run the cat w1_slave command to check that each is operating correctly. It may be useful at this stage to label the individual sensors with their unique serial numbers to make it easy to identify them correctly later.
Record
To record this data we will use a Python program that checks all the sensors and writes the temperature, sensor name and time into our database.
But first we need to ensure that our default version of Python running on the Pi is Python 3.
We can check what version is running by executing the following command;
If that indicates python 2.x, then we need to change that;
To find out what versions of Python 3 is available run the following
Hopefully you will see a 3.x version.
To change the default python version system-wide we can use the update-alternatives command. First list all available python alternatives;
There is a good chance that the output will be something like;
The above error message means that no python alternatives have been recognised by the update-alternatives command. For this reason we need to update our alternatives table and include both python 2 and 3 (make sure that you use the version numbers that are available on your system).
The last number on each of the previous lines is the priority, with the higher number being the highest priority
We can check again by running;
Our Python program will execute the program at a regular interval using cron which we used earlier to automatically reconnect to the network if required.
Record the temperature values
The following Python code (which is based on the code that is part of the great temperature sensing tutorial on iot-project) is a script which allows us to check the temperature reading from multiple sensors and write them to our database with a separate entry for each sensor.
The full code can be found in the code samples bundled with this book (m_temp.py).
#!/usr/bin/python
# -*- coding: utf-8 -*-

import os
import fnmatch
import time
import sqlite3            #Import SQLite library
import logging

logging.basicConfig(filename='/home/pi/DS18B20_error.log',
  level=logging.DEBUG,
  format='%(asctime)s %(levelname)s %(name)s %(message)s')
logger=logging.getLogger(__name__)

# Load the modules (not required if they are loaded at boot)
# os.system('modprobe w1-gpio')
# os.system('modprobe w1-therm')

# Get the time in the right format
dtg = time.strftime('%Y-%m-%d %H:%M:%S', time.localtime())

temperature = []
IDs = []

# Function for storing readings into the database
def insertDB(IDs, temperature, dtg):
  try:
    # Opens a file called measurements
    db = sqlite3.connect('/home/pi/measurements')
    # Get a cursor object
    cursor = db.cursor()
    # Insers the values into the table
    for i in range(0,len(temperature)):
      cursor.execute('''INSERT INTO temperature( \
                        dtg, temperature, sensor_id)
                        VALUES(?,?,?)''', (dtg, temperature[i], IDs[i]))

      # Commit the change
      db.commit()
  # Catch any exception
  except Exception as e:
    # Roll back any change if something goes horribly wrong
    db.rollback()
    raise e
  finally:
    # Close the db connection
    db.close()

for filename in os.listdir("/sys/bus/w1/devices"):
  if fnmatch.fnmatch(filename, '28-*'):
    with open("/sys/bus/w1/devices/" + filename + "/w1_slave") as f_obj:
      lines = f_obj.readlines()
      if lines[0].find("YES"):
        pok = lines[1].find('=')
        temperature.append(float(lines[1][pok+1:pok+6])/1000)
        IDs.append(filename)
      else:
        logger.error("Error reading sensor with ID: %s" % (filename))

if (len(temperature)>0):
  insertDB(IDs, temperature, dtg)
This script can be saved in our home directory (/home/pi) and can be run by typing;
Run this script a few times and then we can check the results in our database by starting up SQLite as follows;
From the SQLite prompt we can query the database to return all the records using SELECT * FROM temperature; as follows;
There are three records for each time that we ran the program, including the times they were taken, the temperature recorded and the serial number of the sensor.
Recording data on a regular basis with cron
As mentioned earlier, while our code is a thing of beauty, it only records a single entry for the light every time it is run.
What we need to implement is a schedule so that at a regular time, the program is run. This is achieved using cron via the crontab.
To set up our schedule we need to edit the crontab file. This is is done using the following command;
Once run it will open the crontab in the nano editor. We want to add in an entry at the end of the file that looks like the following;
This instructs the computer that every minute of every hour of every day of every month we run the command /usr/bin/python /home/pi/m_temp.py (which, if we were at the command line in the pi home directory, we would run as python m_temp.py, but since we can’t guarantee where we will be when running the script, we are supplying the full path to the python command and the m_temp.py script.
Save the file and when the next minute rolls over our program will run on its designated schedule and we will have sensor entries written to our database every minute. Go ahead, check it out by refreshing the temperature table.
Managing database size
While it’s a great idea to save our local data into a database, we stand the risk of gradually letting that database fill up until it exceeds the capacity of our storage.
In the case of the measurements that we are carrying out, the readings are happening pretty regularly, so it’s worth thinking about. Capturing some simple measurements every minute means in the scheme of things that’s about 30,000 recordings per week.
What we’re looking for is a script that will run on a repeating schedule and remove old records. Sound familiar? That’s a very similar process to what we are doing when we record our data. A python script that is executed regularly by cron.
Here’s how we can do it.
The following python script (which we can name db-manage.py) opens our database, deletes any records older than a year, cleans up and exits.
#!/usr/bin/python
#encoding:utf-8

#Import SQLite library
import sqlite3

# Opens a database file called measurements
conn = sqlite3.connect('/home/pi/measurements', isolation_level=None)
db = conn.cursor()

# Delete any records that are older than 1 year
db.execute('DELETE FROM temperature WHERE dtg<DATETIME("now","localtime", "-1 yea\
rs")')
# VACUUM the database to remove any unnecessary data
db.execute('VACUUM')

# Commit the changes to the database and close the connection
conn.commit()
conn.close
The file is available as db-manage.py and can be found in the code sample extras that can be downloaded with this book.
It’s a pretty simple script and we can schedule its operation by editing the crontab file like so;
We want to add in an entry at the end of the file that looks like the following;
1 0 */1 * * /usr/bin/python /home/pi/db-manage.py
This instructs the computer that at 1 minute past the hour at midnight (hence the 0) on the 1st day of every month we run the command /usr/bin/python /home/pi/db-manage.py (which, if we were at the command line in the pi home directory, we would run as python db-manage.py, but since we can’t guarantee where we will be when running the script, we are supplying the full path to the python command and the db-manage.py script.
Save the file and every month our program will run on its designated schedule and will make sure to delete any records older than a year.
Explore
Simple data point API
The main mechanism for exploring and using our data is going to be via a simple data block returned from a http request.
What does all that actually mean?
That’s a good question. Ultimately we’re measuring something and we want to be able to communicate that measurement to an external service. That service could be another database somewhere or to a web page or to a system that will alert based on the value of the light levels being within certain boundaries.
The very simplest way that we can do this is to present the data as the measured values when we ask for them in a web request. This could be thought of as a simplified form of an API (and I plan to make something more complicated in the future).
The data will be presented as JSON as that is one of the most ubiquitous data forms around.
Enough esoterica, what does the magic code look like that will do this?
<?php

$db = new PDO('sqlite://home/pi/measurements');

$result = $db->query('SELECT * FROM temperature ORDER BY dtg DESC LIMIT 1');

$datapie = array();

$result->setFetchMode(PDO::FETCH_ASSOC);

while ($row = $result->fetch()) {
    extract($row);
    echo json_encode($row);
}

?>
We can save this file as temperature.php and have it in the /var/www/html directory on our Pi (temperature.php can be found in the code sample extras that can be downloaded with this book).
How we can put in the IP address of our Pi to our browser along with our distance php file (http://10.1.1.160/temperature.php) and we should get something like the following appear in the browser;
What good will getting this data be? Well……. I’m a bit of a believer that the information that gets captured by the Pi shouldn’t ultimately reside on the device in the long term. In the perfect world I would see it being requested by an external service that was checking a range of data points that would exist around the home (pressure, temperature inside / outside, CO2 levels, is the car parked in the garage, that sort of thing) so this is more of an enabling device than a ‘let’s display stuff’ deal. But I hear what you’re saying. “That’s lame. How can I impress people with that?”. Fair point. To deal with that problem let’s make a simple graph.
Extracting a Range of Data
Righto… If we’re going to make a graph of our light levels we’ll need a variation of our API that will gather and present a range of data that our graph can then display.
This will form a piece of code that our graph will use as a JSON formatted data source.
It will look as follows;
<?php

$data= array();

// connect to the database
$db = new PDO("sqlite://home/pi/measurements");
$db->setAttribute(PDO::ATTR_ERRMODE, PDO::ERRMODE_EXCEPTION);

// prepare SQL command and execute
$query = "SELECT * FROM light WHERE
          dtg>DATETIME('now','localtime', '-24 hours')";
$result = $db->prepare( $query );
$result->execute();

// compile the returned data
$values = $result->fetchAll(PDO::FETCH_ASSOC);
array_push($data, $values);

// print the data
echo json_encode($values);

// close the database connection
$db = NULL;

?>
This block of PHP code will connect to our database and instead of returning a single piece of data it will return (‘echo’) a range of values from the past 24 hours. We’ll call the file temperature-range.php and it will be in the /var/www/html directory. A copy of the file can be found in the code sample extras that can be downloaded with this book.
Graphing Our Data
The following file is our graph which will use our temperature-range.php file and display it. It uses the d3.js visualisation library and for a full description of the workings of the code please feel free to consult a copy of ‘D3 Tips and Tricks v6.x’. It’s free and can be downloaded from here.
<!DOCTYPE html>
<meta charset="utf-8">
<style> /* set the CSS */

body { font: 12px Arial;}

path {
    stroke: steelblue;
    stroke-width: 2;
    fill: none;
}

.axis path,
.axis line {
    fill: none;
    stroke: grey;
    stroke-width: 1;
    shape-rendering: crispEdges;
}

.legend {
    font-size: 16px;
    font-weight: bold;
    text-anchor: middle;
}

</style>
<body>

<!-- load the d3.js library -->
<script src="https://d3js.org/d3.v6.min.js"></script>

<script>

// Set the dimensions of the canvas / graph
var margin = {top: 30, right: 20, bottom: 70, left: 50},
    width = 900 - margin.left - margin.right,
    height = 300 - margin.top - margin.bottom;

// Parse the date / time
var parseDate = d3.timeParse("%Y-%m-%d %H:%M:%S");

// Set the ranges
var x = d3.scaleTime().range([0, width]);
var y = d3.scaleLinear().range([height, 0]);

// Define the line
var priceline = d3.line()
    .x(function(d) { return x(d.date); })
    .y(function(d) { return y(d.price); });

// Adds the svg canvas
var svg = d3.select("body")
    .append("svg")
        .attr("width", width + margin.left + margin.right)
        .attr("height", height + margin.top + margin.bottom)
    .append("g")
        .attr("transform",
              "translate(" + margin.left + "," + margin.top + ")");

// Get the data
d3.json("temperature-range.php").then(function(data) {

  data.forEach(function(d) {
		d.date = parseDate(d.dtg);
		d.price = +d.temperature;
		d.symbol = d.sensor_id;
    });

    // Scale the range of the data
    x.domain(d3.extent(data, function(d) { return d.date; }));
    y.domain(d3.extent(data, function(d) { return d.price; }));

    // Group the entries by symbol
    dataNest = Array.from(
	    d3.group(data, d => d.symbol), ([key, value]) => ({key, value})
	  );

    // set the colour scale
    var color = d3.scaleOrdinal(d3.schemeCategory10);

    legendSpace = width/dataNest.length; // spacing for the legend

    // Loop through each symbol / key
    dataNest.forEach(function(d,i) {

        svg.append("path")
            .attr("class", "line")
            .style("stroke", function() { // Add the colours dynamically
                return d.color = color(d.key); })
            .attr("id", 'tag'+d.key.replace(/\s+/g, '')) // assign an ID
            .attr("d", priceline(d.value));

        // Add the Legend
        svg.append("text")
            .attr("x", (legendSpace/2)+i*legendSpace)  // space legend
            .attr("y", height + (margin.bottom/2)+ 5)
            .attr("class", "legend")    // style the legend
            .style("fill", function() { // Add the colours dynamically
                return d.color = color(d.key); })
            .on("click", function(){
                // Determine if current line is visible
                var active   = d.active ? false : true,
                newOpacity = active ? 0 : 1;
                // Hide or show the elements based on the ID
                d3.select("#tag"+d.key.replace(/\s+/g, ''))
                    .transition().duration(100)
                    .style("opacity", newOpacity);
                // Update whether or not the elements are active
                d.active = active;
                })
            .text(
                function() {
		            if (d.key == '28-00043b6ef8ff') {return "Inlet";}
		            if (d.key == '28-00043e9049ff') {return "Ambient";}
		            if (d.key == '28-00043e8defff') {return "Outlet";}
		            else {return d.key;}
		            });

    });

  // Add the X Axis
  svg.append("g")
      .attr("class", "axis")
      .attr("transform", "translate(0," + height + ")")
      .call(d3.axisBottom(x));

  // Add the Y Axis
  svg.append("g")
      .attr("class", "axis")
      .call(d3.axisLeft(y));

});

</script>
</body>
We will want to place a copy of this file which we will call temperatures-graph.html in the /var/www/html directory. A copy of it can be found in the code sample extras that can be downloaded with this book.
We can see the end result by putting the web address into our browser. It should look something like http://10.1.1.160/temperatures-graph.html. The end result should look a bit like the following (depending on the number of sensors you are using, and the amount of data you have collected)

One of the neat things about this graph is that it ‘builds itself’ in the sense that aside from us deciding what we want to label the specific temperature streams as, the code will organise all the colours and labels for us. Likewise, if the display is getting a bit messy we can click on the legend labels to show / hide the corresponding line.
Wrap Up
We’ve assembled our Raspberry Pi with temperature sensors. We installed an operating system and configured it for use. We’ve set up networking and installed a database and a web server. We’ve written code to record data into our database and an API to pull data out of it. We’ve even installed a graph to display it in a visual form. Nice work.
There is a strong possibility that the information I have laid out here could be littered with evil practices and gross inaccuracies.
But look on the bright side. Irrespective of the nastiness of the way that any of it was accomplished or the inelegance of the code, if the picture drawn on the screen is relatively pretty, you can walk away with a smile. :-)
Those with a smattering of knowledge of any of the topics I have butchered above (or below) are fully justified in feeling a large degree of righteous indignation. To those I say, please feel free to amend where practical and possible, but please bear in mind this was written from the point of view of someone with only a little experience in the topic and therefore try to keep any instructions at a level where a new entrant can step in.
Linux Concepts
What is Linux?
In it’s simplest form, the answer to the question “What is Linux?” is that it’s a computer operating system. As such it is the software that forms a base that allows applications that run on that operating system to run.
In the strictest way of speaking, the term ‘Linux’ refers to the Linux kernel. That is to say the central core of the operating system, but the term is often used to describe the set of programs, tools, and services that are bundled together with the Linux kernel to provide a fully functional operating system.
An operating system is software that manages computer hardware and software resources for computer applications. For example Microsoft Windows could be the operating system that will allow the browser application Firefox to run on our desktop computer.
Linux is a computer operating system that is can be distributed as free and open-source software. The defining component of Linux is the Linux kernel, an operating system kernel first released on 5 October 1991 by Linus Torvalds.
Linux was originally developed as a free operating system for Intel x86-based personal computers. It has since been made available to a huge range of computer hardware platforms and is a leading operating system on servers, mainframe computers and supercomputers. Linux also runs on embedded systems, which are devices whose operating system is typically built into the firmware and is highly tailored to the system; this includes mobile phones, tablet computers, network routers, facility automation controls, televisions and video game consoles. Android, the most widely used operating system for tablets and smart-phones, is built on top of the Linux kernel.

The development of Linux is one of the most prominent examples of free and open-source software collaboration. Typically, Linux is packaged in a form known as a Linux distribution, for both desktop and server use. Popular mainstream Linux distributions include Debian, Ubuntu and the commercial Red Hat Enterprise Linux. Linux distributions include the Linux kernel, supporting utilities and libraries and usually a large amount of application software to carry out the distribution’s intended use.
A distribution intended to run as a server may omit all graphical desktop environments from the standard install, and instead include other software to set up and operate a solution stack such as LAMP (Linux, Apache, MySQL and PHP). Because Linux is freely re-distributable, anyone may create a distribution for any intended use.
Linux is not an operating system that people will typically use on their desktop computers at home and as such, regular computer users can find the barrier to entry for using Linux high. This is made easier through the use of Graphical User Interfaces that are included with many Linux distributions, but these graphical overlays are something of a shim to the underlying workings of the computer. There is a greater degree of control and flexibility to be gained by working with Linux at what is called the ‘Command Line’ (or CLI), and the booming field of educational computer elements such as the Raspberry Pi have provided access to a new world of learning opportunities at this more fundamental level.
Linux Directory Structure
To a new user of Linux, the file structure may feel like something at best arcane and in some cases arbitrary. Of course this isn’t entirely the case and in spite of some distribution specific differences, there is a fairly well laid out hierarchy of directories and files with a good reason for being where they are.
We are frequently comfortable with the concept of navigating this structure using a graphical interface similar to that shown below, but to operate effectively at the command line we need to have a working knowledge of what goes where.
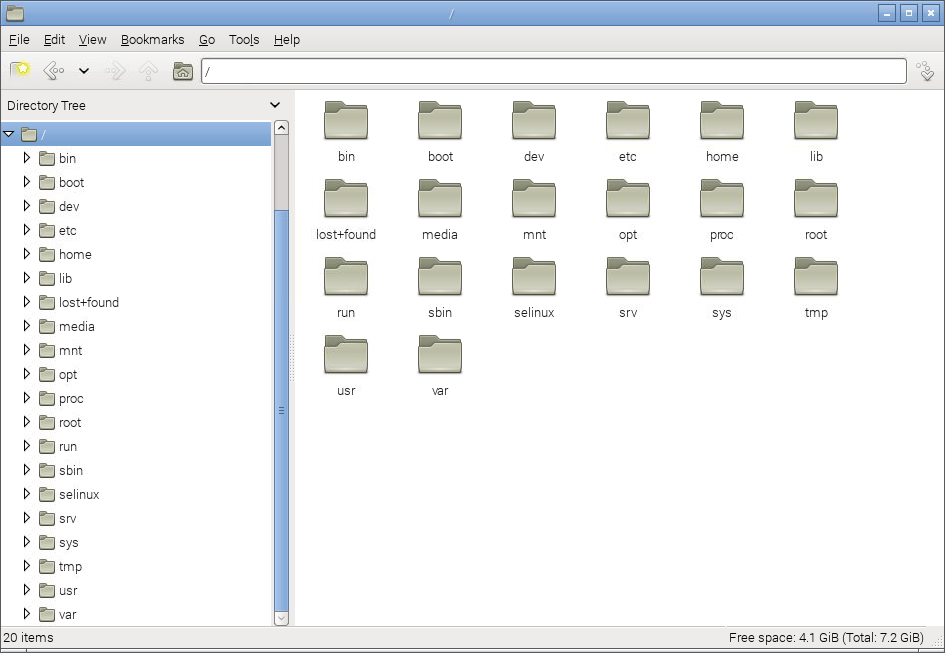
The directories we are going to describe form a hierarchy similar to the following;
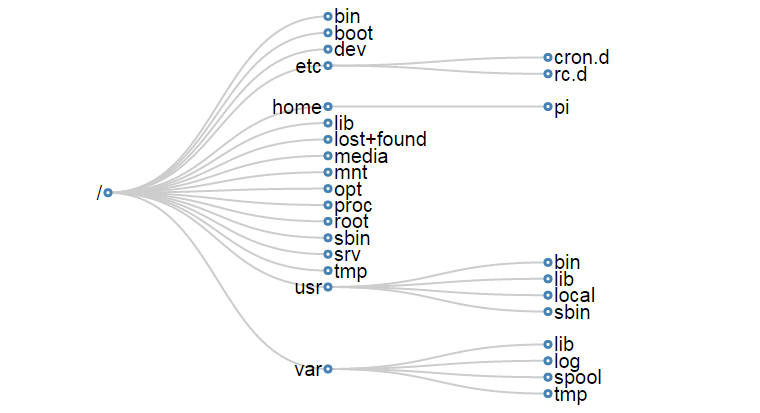
For a concise description of the directory functions check out the cheat sheet. Alternatively their function and descriptions are as follows;
/
The / or ‘root’ directory contains all other files and directories. It is important to note that this is not the root users home directory (although it used to be many years ago). The root user’s home directory is /root. Only the root user has write privileges for this directory.
/bin
The /bin directory contains common essential binary executables / commands for use by all users. For example: the commands cd, cp, ls and ping. These are commands that may be used by both the system administrator and by users, but which are required when no other filesystems are mounted.
/boot
The /boot directory contains the files needed to successfully start the computer during the boot process. As such the /boot directory contains information that is accessed before the Linux kernel begins running the programs and process that allow the operating system to function.
/dev
The /dev directory holds device files that represent physical devices attached to the computer such as hard drives, sound devices and communication ports as well as ‘logical’ devices such as a random number generator and /dev/null which will essentially discard any information sent to it. This directory holds a range of files that strongly reinforces the Linux precept that Everything is a file.
/etc
The /etc directory contains configuration files that control the operation of programs. It also contains scripts used to startup and shutdown individual programs.
/etc/cron.d
The /etc/cron.d, /etc/cron.hourly, /etc/cron.daily, /etc/cron.weekly, /etc/cron.monthly directories contain scripts which are executed on a regular schedule by the crontab process.
/etc/rc?.d
The /rc0.d, /rc1.d, /rc2.d, /rc3.d, /rc4.d, /rc5.d, /rc6.d, /rcS.d directories contain the files required to control system services and configure the mode of operation (runlevel) for the computer.
/home
Because Linux is an operating system that is a ‘multi-user’ environment, each user requires a space to store information specific to them. This is done via the /home directory. For example, the user ‘pi’ would have /home/pi as their home directory.
/lib
The /lib directory contains shared library files that supports the executable files located under /bin and /sbin. It also holds the kernel modules (drivers) responsible for giving Linux a great deal of versatility to add or remove functionality as needs dictate.
/lost+found
The /lost+found directory will contain potentially recoverable data that might be produced if the file system undergoes an improper shut-down due to a crash or power failure. The data recovered is unlikely to be complete or undamaged, but in some circumstances it may hold useful information or pointers to the reason for the improper shut-down.
/media
The /media directory is used as a directory to temporarily mount removable devices (for example, /media/cdrom or /media/cdrecorder). This is a relatively new development for Linux and comes as a result of a degree of historical confusion over where was best to mount these types of devices (/cdrom, /mnt or /mnt/cdrom for example).
/mnt
The /mnt directory is used as a generic mount point for filesystems or devices. Recent use of the directory is directing it towards it being used as a temporary mount point for system administrators, but there is a degree of historical variation that has resulted in different distributions doing things different ways (for example, Debian allocates /floppy and /cdrom as mount points while Redhat places them in /mnt/floppy and /mnt/cdrom respectively).
/opt
The /opt directory is used for the installation of third party or additional optional software that is not part of the default installation. Any applications installed in this area should be installed in such a way that it conforms to a reasonable structure and should not install files outside the /opt directory.
/proc
The /proc directory holds files that contain information about running processes and system resources. It can be described as a pseudo filesystem in the sense that it contains runtime system information, but not ‘real’ files in the normal sense of the word. For example the /proc/cpuinfo file which contains information about the computers cpus is listed as 0 bytes in length and yet if it is listed it will produce a description of the cpus in use.
/root
The /root directory is the home directory of the System Administrator, or the ‘root’ user. This could be viewed as slightly confusing as all other users home directories are in the /home directory and there is already a directory referred to as the ‘root’ directory (/). However, rest assured that there is good reason for doing this (sometimes the /home directory could be mounted on a separate file system that has to be accessed as a remote share).
/sbin
The /sbin directory is similar to the /bin directory in the sense that it holds binary executables / commands, but the ones in /sbin are essential to the working of the operating system and are identified as being those that the system administrator would use in maintaining the system. Examples of these commands are fdisk, shutdown, ifconfig and modprobe.
/srv
The /srv directory is set aside to provide a location for storing data for specific services. The rationale behind using this directory is that processes or services which require a single location and directory hierarchy for data and scripts can have a consistent placement across systems.
/tmp
The /tmp directory is set aside as a location where programs or users that require a temporary location for storing files or data can do so on the understanding that when a system is rebooted or shut down, this location is cleared and the contents deleted.
/usr
The /usr directory serves as a directory where user programs and data are stored and shared. This potential wide range of files and information can make the /usr directory fairly large and complex, so it contains several subdirectories that mirror those in the root (/) directory to make organisation more consistent.
/usr/bin
The /usr/bin directory contains binary executable files for users. The distinction between /bin and /usr/bin is that /bin contains the essential commands required to operate the system even if no other file system is mounted and /usr/bin contains the programs that users will require to do normal tasks. For example; awk, curl, php, python. If you can’t find a user binary under /bin, look under /usr/bin.
/usr/lib
The /usr/lib directory is the equivalent of the /lib directory in that it contains shared library files that supports the executable files for users located under /usr/bin and /usr/sbin.
/usr/local
The /usr/local directory contains users programs that are installed locally from source code. It is placed here specifically to avoid being inadvertently overwritten if the system software is upgraded.
/usr/sbin
The /usr/sbin directory contains non-essential binary executables which are used by the system administrator. For example cron and useradd. If you can’t locate a system binary in /usr/sbin, try /sbin.
/var
The /var directory contains variable data files. These are files that are expected to grow under normal circumstances For example, log files or spool directories for printer queues.
/var/lib
The /var/lib directory holds dynamic state information that programs typically modify while they run. This can be used to preserve the state of an application between reboots or even to share state information between different instances of the same application.
/var/log
The /var/log directory holds log files from a range of programs and services. Files in /var/log can often grow quite large and care should be taken to ensure that the size of the directory is managed appropriately. This can be done with the logrotate program.
/var/spool
The /var/spool directory contains what are called ‘spool’ files that contain data stored for later processing. For example, printers which will queue print jobs in a spool file for eventual printing and then deletion when the resource (the printer) becomes available.
/var/tmp
The /var/tmp directory is a temporary store for data that needs to be held between reboots (unlike /tmp).
Everything is a file in Linux
A phrase that will often come up in Linux conversation is that;
Everything is a file
For someone new to Linux this sounds like some sort of ‘in joke’ that is designed to scare off the unwary and it can sometimes act as a barrier to a deeper understanding of the philosophy behind the approach taken in developing Linux.
The explanation behind the statement is that Linux is designed to be a system built of a group of interacting parts and the way that those parts can work together is to communicate using a common method. That method is to use a file as a common building block and the data in a file as the communications mechanism.
The trick to understanding what ‘Everything is a file’ means, is to broaden our understanding of what a file can be.
Traditional Files
The traditional concept of a file is an object with a specific name in a specific location with a particular content. For example, we might have a file named foo.txt which is in the directory /home/pi/ and it could contain a couple of lines of text similar to the following;
Directories
As unusual as it sounds a directory is also a file. The special aspect of a directory is that is is a file which contains a list of information about which files (and / or subdirectories) it contains. So when we want to list the contents of a directory using the ls command what is actually happening is that the operating system is getting the appropriate information from the file that represents the directory.
System Information
However, files can also be conduits of information. The /proc/ directory contains files that represent system and process information. If we want to determine information about the type of CPU that the computer is using, the file cpuinfo in the /proc/ directory can list it. By running the command `cat /proc/cpuinfo’ we can list a wealth of information about our CPU (the following is a subset of that information by the way);
Now that might not mean a lot to us at this stage, but if we were writing a program that needed a particular type of CPU in order to run successfully it could check this file to ensure that it could operate successfully. There are a wide range of files in the /proc/ directory that represent a great deal of information about how our system is operating.
Devices
When we use different devices in a Linux operating system these are also represented as a file. In the /dev/ directory we have files that represent a range of physical devices that are part of our computer. In larger computer systems with multiple disks they could be represented as /dev/sda1 and /dev/sda2, so that when we wanted to perform an action such as formatting a drive we would use the command mkfs on the /dev/sda1 file.
The /dev/ directory also holds some curious files that are used as tools for generating or managing data. For example /dev/random is an interface to the kernels random number device. /dev/zero represents a file that will constantly stream zeros (while this might sound weird, imagine a situation where you want to write over an area of disk with data to erase it). The most well known of these unusual files is probably /dev/null. This will act as a ‘null device’ that will essentially discard any information sent to it.
File Editing
Working in Linux is an exercise in understanding the concepts that Linux uses as its foundations such as ‘Everything is a file’ and the use of wildcards, pipes and the directory structure.
While working at the command line there will very quickly come the realisation that there is a need to know how to edit a file. Linux being what it is, there are many ways that files can be edited.
An outstanding illustration of this is via the excellent cartoon work of the xkcd comic strip (Buy his stuff, it’s awesome!).

For a taste of the possible options available Wikipedia has got our back. Inevitably where there is choice there are preferences and where there are preferences there is bias. Everyone will have a preference towards a particular editor and don’t let a particular bias influence you to go down a particular direction without considering your options. Speaking from personal experience I was encouraged to use ‘vi’ as it represented the preference of the group I was in, but because I was a late starter to the command line I struggled for the longest time to try and become familiar with it. I know I should have tried harder, but I failed. For a while I wandered in the editor wilderness trying desperately to cling to the GUI where I could use ‘gedit’ or ‘geany’ and then one day I was introduced to ‘nano’.
This has become my preference and I am therefore biased towards it. Don’t take my word for it. Try alternatives. I’ll describe ‘nano’ below, but take that as a possible path and realise that whatever editor works for you will be the right one. The trick is simply to find one that works for you.
The nano Editor
The nano editor can be started from the command line using just the command and the /path/name of the file.
If the file requires administrator permissions it can be executed with ‘sudo`.
When it opens it presents us with a working space and part of the file and some common shortcuts for use at the bottom of the console;
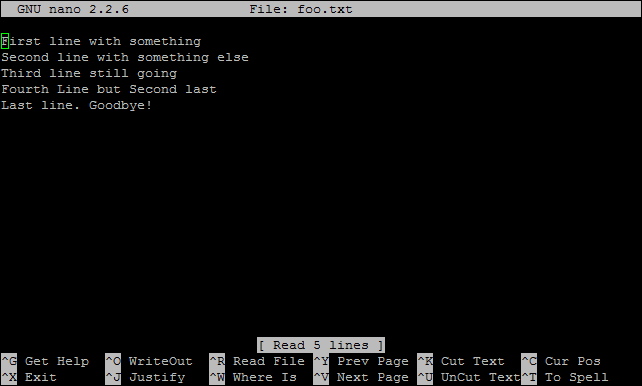
It includes some simple syntax highlighting for common file formats;
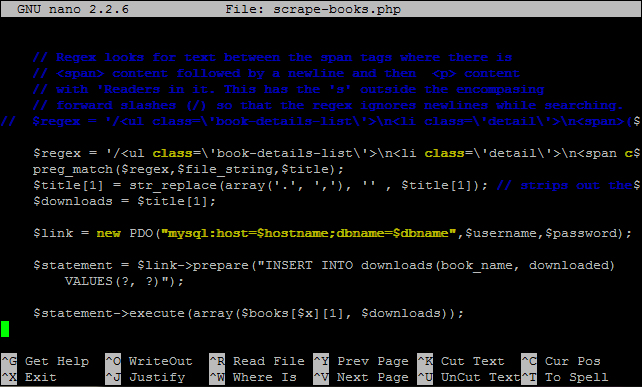
This can be improved if desired (cue Google).
There is a swag of shortcuts to make editing easier, but the simple ones are as follows;
- CTRL-x - Exit the editor. If we are in the middle of editing a file we will be asked if we want to save our work
- CTRL-r - Read a file into our current working file. This enables us to add text from another file while working from within a new file.
- CTRL-k - Cut text.
- CTRL-u - Uncut (or Paste) text.
- CTRL-o - Save file name and continue working.
- CTRL-t - Check the spelling of our text.
- CTRL-w - Search the text.
- CTRL-a - Go to the beginning of the current working line.
- CTRL-e - Go to the end of the current working line.
- CTRL-g - Get help with nano.
The Commands
Commands on Linux operating systems are either built-in or external commands. Built-in commands are part of the shell. External commands are either executables (programs written in a programming language and then compiled into an executable binary) or shell scripts.
A command consists of a command name usually followed by one or more sequences of characters that include options and/or arguments. Each of these strings is separated by white space. The general syntax for commands is;
commandname [options] [arguments]
The square brackets indicate that the enclosed items are optional. Commands typically have a few options and utilise arguments. However, there are some commands that do not accept arguments, and a few with no options.
As an example we can run the ls command with no options or arguments as follows;
The ls command will list the contents of a directory and in this case the command and the output would be expected to look something like the following;
Options
An option (also referred to as a switch or a flag) is a single-letter code, or sometimes a single word or set of words, that modifies the behaviour of a command. When multiple single-letter options are used, all the letters are placed adjacent to each other (not separated by spaces) and can be in any order. The set of options must usually be preceded by a single hyphen, again with no intervening space.
So again using ls if we introduce the option -l we can show the total files in the directory and subdirectories, the names of the files in the current directory, their permissions, the number of subdirectories in directories listed, the size of the file, and the date of last modification.
The command we execute therefore looks like this;
And so the command (with the -l option) and the output would look like the following;
26
drwxr-xr-x 2 pi pi 4096 Feb 20 08:07 Desktop
drwxrwxr-x 2 pi pi 4096 Jan 27 08:34 python_games
Here we can see quite a radical change in the formatting and content of the returned information.
Arguments
An argument (also called a command line argument) is a file name or other data that is provided to a command in order for the command to use it as an input.
Using ls again we can specify that we wish to list the contents of the python_games directory (which we could see when we ran ls) by using the name of the directory as the argument as follows;
The command (with the python_games argument) and the output would look like the following (actually I removed quite a few files to make it a bit more readable);
Putting it all together
And as our final example we can combine our command (ls) with both an option (-l) and an argument (python_games) as follows;
Hopefully by this stage, the output shouldn’t come as too much surprise, although again I have pruned some of the files for readabilities sake;
1800
-rw-rw-r-- 1 pi pi 9731 Jan 27 08:34 4row_arrow.png
-rw-rw-r-- 1 pi pi 7463 Jan 27 08:34 4row_black.png
-rw-rw-r-- 1 pi pi 8666 Jan 27 08:34 4row_board.png
-rw-rw-r-- 1 pi pi 18933 Jan 27 08:34 4row_computerwinner.png
-rw-rw-r-- 1 pi pi 25412 Jan 27 08:34 4row_humanwinner.png
-rw-rw-r-- 1 pi pi 8562 Jan 27 08:34 4row_red.png
-rw-rw-r-- 1 pi pi 14661 Jan 27 08:34 tetrisc.mid
-rw-rw-r-- 1 pi pi 15759 Jan 27 08:34 tetrominoforidiots.py
-rw-rw-r-- 1 pi pi 18679 Jan 27 08:34 tetromino.py
-rw-rw-r-- 1 pi pi 9771 Jan 27 08:34 Tree_Short.png
-rw-rw-r-- 1 pi pi 11546 Jan 27 08:34 Tree_Tall.png
-rw-rw-r-- 1 pi pi 10378 Jan 27 08:34 Tree_Ugly.png
-rw-rw-r-- 1 pi pi 8443 Jan 27 08:34 Wall_Block_Tall.png
-rw-rw-r-- 1 pi pi 6011 Jan 27 08:34 Wood_Block_Tall.png
-rw-rw-r-- 1 pi pi 8118 Jan 27 08:34 wormy.py
apt-get
The apt-get command is a program, that is used with Debian based Linux distributions to install, remove or upgrade software packages. It’s a vital tool for installing and managing software and should be used on a regular basis to ensure that software is up to date and security patching requirements are met.
There are a plethora of uses for apt-get, but we will consider the basics that will allow us to get by. These will include;
- Updating the database of available applications (
apt-get update) - Upgrading the applications on the system (
apt-get upgrade) - Installing an application (
apt-get install *package-name*) - Un-installing an application (
apt-get remove *package-name*)
The apt-get command
The apt part of apt-get stands for ‘advanced packaging tool’. The program is a process for managing software packages installed on Linux machines, or more specifically Debian based Linux machines (Since those based on ‘redhat’ typically use their rpm (red hat package management (or more lately the recursively named ‘rpm package management’) system). As Raspbian is based on Debian, so the examples we will be using are based on apt-get.
APT simplifies the process of managing software on Unix-like computer systems by automating the retrieval, configuration and installation of software packages. This was historically a process best described as ‘dependency hell’ where the requirements for different packages could mean a manual installation of a simple software application could lead a user into a sink-hole of despair.
In common apt-get usage we will be prefixing the command with sudo to give ourselves the appropriate permissions;
apt-get update
This will resynchronize our local list of packages files, updating information about new and recently changed packages. If an apt-get upgrade (see below) is planned, an apt-get update should always be performed first.
Once the command is executed, the computer will delve into the internet to source the lists of current packages and download them so that we will see a list of software sources similar to the following appear;
[490 B]
Get:2 http://archive.raspberrypi.org wheezy Release.gpg [473 B]
Hit http://raspberrypi.collabora.com wheezy Release
Get:3 http://mirrordirector.raspbian.org wheezy Release [14.4 kB]
Get:4 http://archive.raspberrypi.org wheezy Release [17.6 kB]
Hit http://raspberrypi.collabora.com wheezy/rpi armhf Packages
Get:5 http://mirrordirector.raspbian.org wheezy/main armhf Packages [6,904 kB]
Get:6 http://archive.raspberrypi.org wheezy/main armhf Packages [130 kB]
Ign http://raspberrypi.collabora.com wheezy/rpi Translation-en
Ign http://mirrordirector.raspbian.org wheezy/contrib Translation-en
Ign http://mirrordirector.raspbian.org wheezy/main Translation-en
Ign http://mirrordirector.raspbian.org wheezy/non-free Translation-en
Ign http://mirrordirector.raspbian.org wheezy/rpi Translation-en
Fetched 7,140 kB in 35s (200 kB/s)
Reading package lists... Done
apt-get upgrade
The apt-get upgrade command will install the newest versions of all packages currently installed on the system. If a package is currently installed and a new version is available, it will be retrieved and upgraded. Any new versions of current packages that cannot be upgraded without changing the install status of another package will be left as they are.
As mentioned above, an apt-get update should always be performed first so that apt-get upgrade knows which new versions of packages are available.
Once the command is executed, the computer will consider its installed applications against the databases list of the most up to date packages and it will prompt us with a message that will let us know how many packages are available for upgrade, how much data will need to be downloaded and what impact this will have on our local storage. At this point we get to decide whether or not we want to continue;
6 upgraded, 0 newly installed, 0 to remove and 0 not upgraded.
Need to get 10.7 MB of archives.
After this operation, 556 kB disk space will be freed.
Do you want to continue [Y/n]?
Once we say yes (‘Y’) the upgrade kicks off and we will see a list of the packages as they are downloaded unpacked and installed (what follows is an edited example);
continue [Y/n]? y
Get:1 http://archive.raspberrypi.org/debian/wheezy/main libsdl1.2debian
armhf 1.2.15-5+rpi1 [205 kB]
Get:2 http://archive.raspberrypi.org/debian/wheezy/main raspi-config all
20150131-5 [13.3 kB]
Get:3 http://mirrordirector.raspbian.org/raspbian/ wheezy/main libsqlite3-0
armhf 3.7.13-1+deb7u2 [414 kB]
Fetched 10.7 MB in 31s (343 kB/s)
Preconfiguring packages ...
(Reading database ... 80703 files and directories currently installed.)
Preparing to replace cups-common 1.5.3-5+deb7u5
(using .../cups-common_1.5.3-5+deb7u6_all.deb) ...
Unpacking replacement cups-common ...
Preparing to replace cups-bsd 1.5.3-5+deb7u5
(using .../cups-bsd_1.5.3-5+deb7u6_armhf.deb) ...
Unpacking replacement cups-bsd ...
Preparing to replace php5-gd 5.4.39-0+deb7u2
(using .../php5-gd_5.4.41-0+deb7u1_armhf.deb) ...
Unpacking replacement php5-gd ...
Processing triggers for man-db ...
Setting up libssl1.0.0:armhf (1.0.1e-2+rvt+deb7u17) ...
Setting up libsqlite3-0:armhf (3.7.13-1+deb7u2) ...
Setting up cups-common (1.5.3-5+deb7u6) ...
Setting up cups-client (1.5.3-5+deb7u6) ...
There can often be alerts as the process identifies different issues that it thinks the system might strike (different aliases, runtime levels or missing fully qualified domain names). This is not necessarily a sign of problems so much as an indication that the process had to take certain configurations into account when upgrading and these are worth noting. Whenever there is any doubt about what has occurred, Google will be your friend :-).
apt-get install
The apt-get install command installs or upgrades one (or more) packages. All additional (dependency) packages required will also be retrieved and installed.
If we want to install multiple packages we can simply list each package separated by a space after the command as follows;
apt-get remove
The apt-get remove command removes one (or more) packages.
cat
The cat command is a really versatile command that is typically used to carry out three different functions. It can display a file on the screen, combine different files together (concatenate them) or create new files. This is another core command that is immensely useful to learn in when working with Linux from the command line. It’s simple, flexible and versatile.
-
cat[options] filename filename : Display, combine or create new files.
For example: To display the file foo.txt on the screen we would use;
To display the files foo.txt and bar.txt on the screen one after the other we would use;
Or to combine the files foo.txt and bar.txt into a new file called foobar.txt using the redirection symbol >;
The cat command
The cat command is a vital tool to use on the Linux command line because ultimately Linux is an operating system that is file driven. Without a graphical user interface there needs to be a mechanism whereby creating and manipulating text files can be accomplished easily. The cat command is one of the commands that makes this possible. The name ‘cat’ is short for ‘catenate’ or ‘concatenate’ (either appears to be acceptable, but ‘concatenate’ appears to be more widely used), which is to say to connect things in a series. This is certainly one of it’s common uses, but a better overview would be to say that the cat command is used to;
- Display text files at the command line
- Join one text file to the end of another text file, combining them
- Copy text files into a new document
Options
The only option that gets any degree of use with cat is the -n option that numbers the output lines.
Arguments and Examples
To display text
For example, to display a text file (foo.txt) on the screen we can use the following command;
The output would be;
As we can see, the contents of the file ‘foo.txt’ is sent to the screen (be aware, if the file is sufficiently large, it will simple dump the contents in a long scrolling waterfall of text).
To join more than one file together
We could just as easily display two files one after the other (concatenated) as follows;
The output would be;
To create a new file
Instead of having the file sent to the screen, we can specify that cat send our file to a new (renamed) file as follows;
This could be thought of an a equivalent to a file copy action and uses the redirection symbol >.
Taking the process one step further we can take our original two files and combine them into a single file with;
We can then check the results of our combination using cat on the new file as follows;
And the output would be;
Then we could use cat to append a file to an already existing file by using the redirection operator >>;
Here we use the redirection operator >> to add the contents of the file newfoo.txt to the already existing file foobar.txt.
The resulting file content would be;
Finally, we can use cat to create a file from scratch. In this scenario if we use cat without a source file and redirect to a new file (here called newfile.txt. It will take the input from the command line to add to the file until CONTROL-d is pressed.
The resulting file content would be;
until...
we press ctrl-d to finish and the file gets written!
Test yourself
- Which is the safest redirector to use?
- Create a new file using
catand enter a few lines of text to give it some content - Copy that file using
catto a new file. - Combine the original file and the copy into a new file.
- Display that new file on the screen.
cd
The cd command is used to move around in the directory structure of the file system (change directory). It is one of the fundamental commands for navigating the Linux directory structure.
cd [options] directory : Used to change the current directory.
For example, when we first log into the Raspberry Pi as the ‘pi’ user we will find ourselves in the /home/pi directory. If we wanted to change into the /home directory (go up a level) we could use the command;
Take some time to get familiar with the concept of moving around the directory structure from the command line as it is an important skill to establish early in Linux.
The cd command
The cd command will be one of the first commands that someone starting with Linux will use. It is used to move around in the directory structure of the file system (hence cd = change directory). It only has two options and these are seldom used. The arguments consist of pointing to the directory that we want to go to and these can be absolute or relative paths.
The cd command can be used without options or arguments. In this case it returns us to our home directory as specified in the /etc/passwd file.
If we cd into any random directory (try cd /var) we can then run cd by itself;
… and in the case of a vanilla installation of Raspbian, we will change to the /home/pi directory;
cd /var
pi@raspberrypi /var $ cd
pi@raspberrypi ~ $ pwd
/home/pi
In the example above, we changed to /var and then ran the cd command by itself and then we ran the pwd command which showed us that the present working directory is /home/pi. This is the Raspbian default home directory for the pi user.
Options
As mentioned, there are only two options available to use with the cd command. This is -P which instructs cd to use the physical directory structure instead of following symbolic links and the -L option which forces symbolic links to be followed.
For those beginning Linux, there is little likelihood of using either of these two options in the immediate future and I suggest that you use your valuable memory to remember other Linux stuff.
Arguments
As mentioned earlier, the default argument (if none is included) is to return to the users home directory as specified in the /etc/passwd file.
When specifying a directory we can do this by absolute or relative addressing. So if we started in the /home/pi directory, we could go the /home directory by executing;
… or using relative addressing and we can use the .. symbols to designate the parent directory;
Once in the /home directory, we can change into the /home/pi/Desktop directory using relative addressing as follows;
We can also use the - argument to navigate to the previous directory we were in.
Examples
Change into the root (/) directory;
Test yourself
- Having just changed from the
/home/pidirectory to the/homedirectory, what are the five variations of using thecdcommand that will take the pi user to the/home/pidirectory - Starting in the
/home/pidirectory and using only relative addressing, usecdto change into the/vardirectory.
chmod
The chmod command allows us to set or modify a file’s permissions. Because Linux is built as a multi-user system there are typically multiple different users with differing permissions for which files they can read / write or execute. chmod allows us to limit access to authorised users to do things like editing web files while general users can only read the files.
-
chmod[options] mode files : Change access permissions of one or more files & directories
For example, the following command (which would most likely be prefixed with sudo) sets the permissions for the /var/www directory so that the user can read from, write to and change into the directory. Group owners can also read from, write to and change into the directory. All others can read from and change into the directory, but they cannot create or delete a file within it;
This might allow normal users to browse web pages on a server, but prevent them from editing those pages (which is probably a good thing).
The chmod command
The chmod command allows us to change the permissions for which user is allowed to do what (read, write or execute) to files and directories. It does this by changing the ‘mode’ (hence chmod = change file mode) of the file where we can make the assumption that ‘mode’ = permissions.
Every file on the computer has an associated set of permissions. Permissions tell the operating system what can be done with that file and by whom. There are three things you can (or can’t) do with a given file:
- read it,
- write (modify) it and
- execute it.
Linux permissions specify what the owning user can do, what the members of the owning group can do and what other users can do with the file. For any given user, we need three bits to specify access permissions: the first to denote read (r) access, the second to denote (w) access and the third to denote execute (x) access.
We also have three levels of ownership: ‘user’, ‘group’ and ‘others’ so we need a triplet (three sets of three) for each, resulting in nine bits.
The following diagram shows how this grouping of permissions can be represented on a Linux system where the user, group and others had full read, write and execute permissions;

If we had a file with more complex permissions where the user could read, write and execute, the group could read and write, but all other users could only read it would look as follows;

This description of permissions is workable, but we will need to be aware that the permissions are also represented as 3 bit values (where each bit is a ‘1’ or a ‘0’ (where a ‘1’ is yes you can, or ‘0’ is no you can’t)) or as the equivalent octal value.
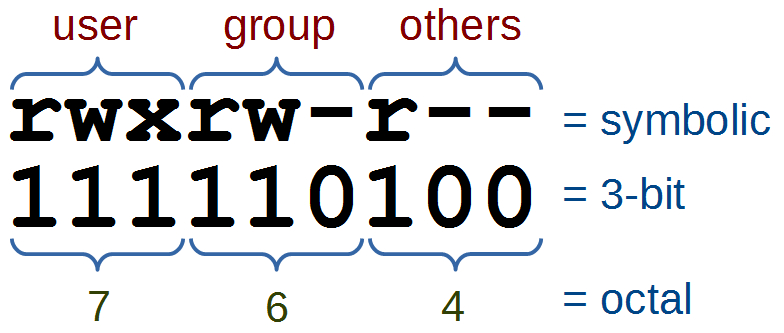
The full range of possible values for these permission combinations is as follows;
Another interesting thing to note is that permissions take a different slant for directories.
- read determines if a user can view the directory’s contents, i.e. execute
lsin it. - write determines if a user can create new files or delete file in the directory. (Note here that this essentially means that a user with write access to a directory can delete files in the directory even if he/she doesn’t have write permissions for the file! So be careful.)
- execute determines if the user can cd into the directory.
We can check the check the permissions of files using the ls -l command which will list files in a long format as follows;
This command will list the details of the file foo.txt that is in the /tmp directory as follows
1 pi pi-group 20 Jul 10 13:14 foo.txt
The permissions on the file, the user and the group owner can be found as follows;

From this information we can see that the file’s user (‘pi’) has permissions to read, write and execute the file. The group owner (‘pi-group’) can read and write to the file and all other users can read the file.
Options
The main option that is worth remembering is the -R option that will Recursively apply permissions on the files in the specified directory and its sub-directories.
The following command will change the permissions for all the files in the /srv/foo directory and in all the directories that are under it;
Arguments
Simplistically (in other words it can be more complicated, but we’re simplifying it) there are two main ways that chmod is used. In either symbolic mode where the permissions are changed using symbols associated with read, write and execute as well as symbols for the user (u), the group owner (g), others (o) and all users (a). Or in numeric mode where we use the octal values for permission combinations.
Symbolic Mode
In symbolic mode we can change the permissions of a file with the following syntax:
-
chmod[who][op][permissions] filename
Where who can be the user (u), the group owner (g) and / or others (o). The operator (op) is either + to add a permission, - to remove a permission or = to explicitly set permissions. The permissions themselves are either readable (r), writeable (w), or executable (x).
For example the following command adds executable permissions (x) to the user (u) for the file /tmp/foo.txt;
This command removes writing (w) and executing (x) permissions from the group owner (g) and all others (o) for the same file;
Note that removing the execute permission from a directory will prevent you from being able to list its contents (although root will override this). If you accidentally remove the execute permission from a directory, you can use the +X argument to instruct chmod to only apply the execute permission to directories.
Numeric Mode
In numeric mode we can explicitly state the permissions using the octal values, so this form of the command is fairly common.
For example, the following command will change the permissions on the file foo.txt so that the user can read, write and execute it, the group owner can read and write it and all others can read it;
Examples
To change the permissions in your home directory to remove reading and executing permissions from the group owner and all other users;
To make a script executable by the user;
Windows marks all files as executable by default. If you copy a file or directory from a Windows system (or even a Windows-formatted disk) to your Linux system, you should ideally strip the unnecessary execute permissions from all copied files unless you specifically need to retain it. Note of course we still need it on all //directories// so that we can access their contents! Here’s how we can achieve this in one command:
This instructs chmod to remove the execute permission for each file and directory, and then immediately set execute again if working on a directory.
crontab
The crontab command give the user the ability to schedule tasks to be run at a specific time or with a specific interval. If you want to move beyond using Linux from a graphical user interface, you will most likely want to schedule a task to run at a particular time or interval. Even just learning about it might give you ideas of what you might do.
-
crontab[-u user] [-l | -r | -e] : Schedule a task to run at a particular time or interval
For example, you could schedule a script to run every day to carry our a backup process in the middle of the night. or capture some data every hour to store in a database.
The crontab command
The command crontab is a concatenation of ‘cron table’ because it uses the job scheduler cron to execute tasks which are stored in a ‘table’ of sorts in the users crontab file. cron is named after ‘Khronos’, the Greek personification of time.
While each user who sets up a job to run using the crontab creates a crontab file, the file is not intended to be edited by hand. It is in different locations in different flavour of Linux distributions and the most reliable mechanism for editing it is by running the crontab -e command. Each user has their own crontab file and the root user can edit another users crontab file. This would be the situation where we would use the -u option, but honestly once we get to that stage it can probably be assumed that we know a fair bit about Linux.
There are only three main options that are used with crontab.
Options
The first option that we should examine is the -l option which allows us to list the crontab file;
Once run it will list the contents of the crontab file directly to the screen. The output will look something like;
Here we can see that the main part of the file (in fact everything except the final line) is comments that explain how to include an entry into the crontab file.
The entry in this case is specified to run every 10 minutes and when it does, it will run the PHP script scrape-books.php (we’ll explain how this is encoded later in the examples section).
If we want to remove the current crontab we can use the -r option. Probably not something that we would do an a regular basis, as it would be more likely to be editing the content rather than just removing it wholesale.
Lastly there is the option to edit the crontab file which is initiated using -e. This is the main option that would be used and the one we will cover in detail in the examples below.
Examples
As an example, consider that we wish to run a Python script every day at 6am. The following command will let us edit the crontab;
Once run it will open the crontab in the default editor on your system (most likely ‘vi’, ‘vim’ or ‘nano’). The file will look as follows;
As stated earlier, the default file obviously includes some explanation of how to format an entry in the crontab. In our case we wish to add in an entry that tells the script to start at 6 hours and 0 minutes each day. The crontab accepts six pieces of information that will allow that action to be performed. each of those pieces is separated by a space.
- A number (or range of numbers), m, that represents the minute of the hour (valid values 0-59);
- A number (or range of numbers), h, that represents the hour of the day (valid values 0-23);
- A number (or range of numbers), dom, that represents the day of the month (valid values 0-31);
- A number (or list, or range), or name (or list of names), mon, that represents the month of the year (valid values 1-12 or Jan-Dec);
- A number (or list, or range), or name (or list of names), dow, that represents the day of the week (valid values 0-6 or Sun-Sat); and
- command, which is the command to be run, exactly as it would appear on the command line.
The layout is therefore as follows;
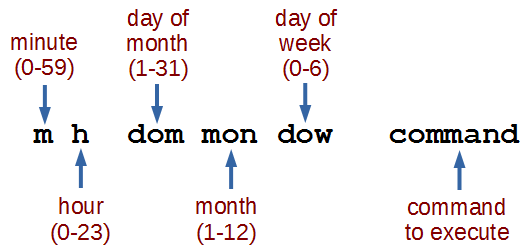
Assuming that we want to run a Python script called ‘m_temp.py` which was in the ‘pi’ home directory the line that we would want to add would be as follows;
0 6 * * * /usr/bin/python /home/pi/m_temp.py
So at minute 0, hour 6, every day of the month (where the asterisk denotes ‘everything’), every month, every day of the week we run the command /usr/bin/python /home/pi/m_temp.py (which, if we were at the command line in the pi home directory we would run as python m_temp.py, but since we can’t guarantee where we will be when running the script, we are supplying the full path to the python command and the m_temp.py script.
If we wanted to run the command twice a day (6am and 6pm (1800hrs)) we can supply a comma separated value in the hours (h) field as follows;
0 6,18 * * * /usr/bin/python /home/pi/m_temp.py
If we wanted to run the command at 6am but only on weekdays (Monday through Friday) we can supply a range in the dow field as follows (remembering that 0 = Sunday);
0 6 * * 1-5 /usr/bin/python /home/pi/m_temp.py
If we want to run the same command every 2 hours we can use the */2 notation, so that our line in the crontab would look like the following;
0 */2 * * * /usr/bin/python /home/pi/m_temp.py
It’s important to note that we need to include the 0 at the start (instead of the *) so that it doesn’t run every minute every 2 hours (every minute in other words)
Test yourself
- How could you set up a schedule job in crontab that ran every second?
- Create a crontab line to run a command on the 20th of July every year at 2 minutes past midnight.
ifconfig
The ifconfig command can be used to view the configuration of, or to configure a network interface. Networking is a fundamental function of modern computers. ifconfig allows us to configure the network interfaces to allow that connection.
-
ifconfig[arguments] [interface]
or
-
ifconfig[arguments] interface [options]
Used with no ‘interface’ declared ifconfig will display information about all the operational network interfaces. For example running;
… produces something similar to the following on a simple Raspberry Pi.
76:12:45:56:47:53
UP BROADCAST MULTICAST MTU:1500 Metric:1
RX packets:0 errors:0 dropped:0 overruns:0 frame:0
TX packets:0 errors:0 dropped:0 overruns:0 carrier:0
collisions:0 txqueuelen:1000
RX bytes:0 (0.0 B) TX bytes:0 (0.0 B)
lo Link encap:Local Loopback
inet addr:127.0.0.1 Mask:255.0.0.0
UP LOOPBACK RUNNING MTU:65536 Metric:1
RX packets:0 errors:0 dropped:0 overruns:0 frame:0
TX packets:0 errors:0 dropped:0 overruns:0 carrier:0
collisions:0 txqueuelen:0
RX bytes:0 (0.0 B) TX bytes:0 (0.0 B)
wlan0 Link encap:Ethernet HWaddr 09:87:65:54:43:32
inet addr:10.1.1.8 Bcast:10.1.1.255 Mask:255.255.255.0
UP BROADCAST RUNNING MULTICAST MTU:1500 Metric:1
RX packets:3978 errors:0 dropped:898 overruns:0 frame:0
TX packets:347 errors:0 dropped:0 overruns:0 carrier:0
collisions:0 txqueuelen:1000
RX bytes:859773 (839.6 KiB) TX bytes:39625 (38.6 KiB)
The output above is broken into three sections; eth0, lo and wlan0.
-
eth0is the first Ethernet interface and in our case represents the RJ45 network port on the Raspberry Pi (in this specific case on a B+ model). If we had more than one Ethernet interface, they would be namedeth1,eth2, etc. -
lois the loopback interface. This is a special network interface that the system uses to communicate with itself. You can notice that it has the IP address 127.0.0.1 assigned to it. This is described as designating the ‘localhost’. -
wlan0is the name of the first wireless network interface on the computer. This reflects a wireless USB adapter (if installed). Any additional wireless interfaces would be namedwlan1,wlan2, etc.
The ifconfig command
The ifconfig command is used to read and manage a servers network interface configuration (hence ifconfig = interface configuration).
We can use the ifconfig command to display the current network configuration information, set up an ip address, netmask or broadcast address on an network interface, create an alias for network interface, set up hardware addresses and enable or disable network interfaces.
To view the details of a specific interface we can specify that interface as an argument;
Which will produce something similar to the following;
(8.4 MiB) TX bytes:879127 (858.5 KiB)
The configuration details being displayed above can be interpreted as follows;
-
Link encap:Ethernet- This tells us that the interface is an Ethernet related device. -
HWaddr b8:27:eb:2c:bc:62- This is the hardware address or Media Access Control (MAC) address which is unique to each Ethernet card. Kind of like a serial number. -
inet addr:10.1.1.8- indicates the interfaces IP address. -
Bcast:10.1.1.255- denotes the interfaces broadcast address -
Mask:255.255.255.0- is the network mask for that interface. -
UP- Indicates that the kernel modules for the Ethernet interface have been loaded. -
BROADCAST- Tells us that the Ethernet device supports broadcasting (used to obtain IP address via DHCP). -
RUNNING- Lets us know that the interface is ready to accept data. -
MULTICAST- Indicates that the Ethernet interface supports multicasting. -
MTU:1500- Short for for Maximum Transmission Unit is the size of each packet received by the Ethernet card. -
Metric:1- The value for the Metric of an interface decides the priority of the device (to designate which of more than one devices should be used for routing packets). -
RX packets:119833 errors:0 dropped:0 overruns:0 frame:0andTX packets:8279 errors:0 dropped:0 overruns:0 carrier:0- Show the total number of packets received and transmitted with their respective errors, number of dropped packets and overruns respectively. -
collisions:0- Shows the number of packets which are colliding while traversing the network. -
txqueuelen:1000- Tells us the length of the transmit queue of the device. -
RX bytes:8895891 (8.4 MiB)andTX bytes:879127 (858.5 KiB)- Indicates the total amount of data that has passed through the Ethernet interface in transmit and receive.
Options
The main option that would be used with ifconfig is -a which will will display all of the interfaces on the interfaces available (ones that are ‘up’ (active) and ‘down’ (shut down). The default use of the ifconfig command without any arguments or options will display only the active interfaces.
Arguments
We can disable an interface (turn it down) by specifying the interface name and using the suffix ‘down’ as follows;
Or we can make it active (bring it up) by specifying the interface name and using the suffix ‘up’ as follows;
To assign a IP address to a specific interface we can specify the interface name and use the IP address as the suffix;
To add a netmask to a a specific interface we can specify the interface name and use the netmask argument followed by the netmask value;
To assign an IP address and a netmask at the same time we can combine the arguments into the same command;
Test yourself
- List all the network interfaces on your server.
- Why might it be a bad idea to turn down a network interface while working on a server remotely?
- Display the information about a specific interface, turn it down, display the information about it again then turn it up. What differences do you see?
ls
The ls command lists the contents of a directory and can show the properties of those objects it lists. It is one of the fundamental commands for knowing what files are where and the properties of those files.
-
ls[options] directory : List the files in a particular directory
For example: If we execute the ls command with the -l option to show the properties of the listings in long format and with the argument /var so that it lists the content of the /var directory…
… we should see the following;
102440
drwxr-xr-x 2 root root 4096 Mar 7 06:25 backups
drwxr-xr-x 12 root root 4096 Feb 20 08:33 cache
drwxr-xr-x 43 root root 4096 Feb 20 08:33 lib
drwxrwsr-x 2 root uucp 4096 Jan 11 00:02 local
lrwxrwxrwx 1 root root 9 Feb 15 11:23 lock -> /run/lock
drwxr-xr-x 11 root root 4096 Jul 7 06:25 log
drwxrwsr-x 2 root mail 4096 Feb 15 11:23 mail
drwxr-xr-x 2 root root 4096 Feb 15 11:23 opt
lrwxrwxrwx 1 root root 4 Feb 15 11:23 run -> /run
drwxr-xr-x 4 root root 4096 Feb 15 11:26 spool
-rw------- 1 root root 104857600 Feb 16 14:03 swap
drwxrwxrwt 2 root root 4096 Jan 11 00:02 tmp
drwxrwxr-x 2 www-data www-data 4096 Feb 20 08:21 www
The ls command
The ls command will be one of the first commands that someone starting with Linux will use. It is used to list the contents of a directory (hence ls = list). It has a large number of options for displaying listings and their properties in different ways. The arguments used are normally the name of the directory or file that we want to show the contents of.
By default the ls command will show the contents of the current directory that the user is in and just the names of the files that it sees in the directory. So if we execute the ls command on its own from the pi users home directory (where we would be after booting up the Raspberry Pi), this is the command we would use;
… and we should see the following;
This shows two directories (Desktop and python_games) that are in pi’s home directory, but there are no details about the directories themselves. To get more information we need to include some options.
Options
There are a very large number of options available to use with the ls command. For a full listing type man ls on the command line. Some of the most commonly used are;
-
-lgives us a long listing (as explained above) -
-ashows us aLL the files in the directory, including hidden files -
-sshows us the size of the files (in blocks, not bytes) -
-hshows the size in “human readable format” (ie: 4K, 16M, 1G etc). (must be used in conjunction with the -s option). -
-Ssorts by file Size -
-tsorts by modification time -
-rreverses order while sorting
A useful combination of options could be a long listing (-l) that shows all (-a) the files with the file size being reported in human readable (-h) block size (-s).
… will produce something like the following;
4.0K drwxr-xr-x 13 pi pi 4.0K May 7 11:46 .
4.0K drwxr-xr-x 3 root root 4.0K May 7 10:20 ..
4.0K -rw-r--r-- 1 pi pi 69 May 7 11:46 .asoundrc
4.0K -rw------- 1 pi pi 854 Jul 8 12:55 .bash_history
4.0K -rw-r--r-- 1 pi pi 3.2K May 7 10:20 .bashrc
4.0K drwxr-xr-x 4 pi pi 4.0K May 7 11:46 .cache
4.0K drwxr-xr-x 7 pi pi 4.0K May 7 11:46 .config
4.0K drwxr-xr-x 2 pi pi 4.0K May 7 11:46 Desktop
4.0K drwxr-xr-x 2 pi pi 4.0K May 7 11:46 .fontconfig
4.0K drwxr-xr-x 2 pi pi 4.0K May 7 11:46 .gstreamer-0.10
4.0K drwx------ 3 pi pi 4.0K May 7 11:46 .local
4.0K -rw-r--r-- 1 pi pi 675 May 7 10:20 .profile
4.0K drwxrwxr-x 2 pi pi 4.0K Jan 27 21:34 python_games
4.0K drwxr-xr-x 3 pi pi 4.0K May 7 11:46 .themes
Arguments
The default argument (if none is included) is to list the contents of the directory that the user is currently in. Otherwise we can specify the directory to list. This might seem like a simple task, but there are a few tricks that can make using ls really versatile.
The simplest example of using a specific directory for an argument is to specify the location with the full address. For example, if we wanted to list the contents of the /var directory (and it doesn’t matter which directory we run this command from) we simply type;
… will produce the following;
local lock log mail opt run spool swap tmp www
We can also use some of the relative addressing characters to shortcut our listing. We can list the home directory by using the tilde (ls ~) and the parent directory by using two full stops (ls ..).
The asterisk (*) can be used as a wildcard to list files with similar names. E.g. to list all the png file in a directory we can use ls *.png.
If we just want to know the details of a specific file we can use its name explicitly. For example if we wanted to know the details of the swap file in /var we would use the following command;
… which will produce the following;
1 root root 104857600 May 7 11:29 /var/swap
Examples
List all the configuration (.conf) files in the /etc directory;
… which will produce the following;
modprobe
The modprobe command allows us to add (or remove) modules to the Linux Kernel. The Linux kernel is the code that forms the core of the Linux operating system, so it’s kind of important. When changing hardware, the modprobe command allows us to import or remove the equivalent of windows device drivers to / from the kernel to enable / disable additional functionality.
-
modprobe[options] [modulename] : Load or remove a Linux kernel module
For example to add the module w1-therm to support measurement of temperature via the 1-Wire bus we would execute the following command;
The modprobe command
The Linux kernel is designed with a monolithic structure, but with the ability to be able to change kernel modules while running. (Windows 7 and OS X use hybrid kernels which offer the advantage of being smaller in size, but they require more management of the drivers by the user and manufacturer).
To work around the disadvantage of having a large footprint, Linux kernel developers have incorporated the facility to add or remove kernel modules on the fly. This can be taken to the extreme where the the entire kernel module can be replaced without needing to reboot.
Kernel modules are typically located in the lib/modules directory and can be listed using the following command;
An output might look something like the following;
$(uname -r)
kernel modules.builtin modules.dep.bin modules.softdep
modules.alias modules.builtin.bin modules.devname modules.symbols
modules.alias.bin modules.dep modules.order modules.symbols.bin
We can also list all the loaded modules using the command lsmod as follows;
A sample output might looks similar to the following;
2559 0
wire 25680 1 w1_therm
cn 4636 1 wire
rfkill 16651 1 cfg80211
i2c_dev 6027 0
snd_bcm2835 18649 0
snd_pcm 73475 1 snd_bcm2835
snd_seq 53078 0
snd_seq_device 5628 1 snd_seq
snd_timer 17784 2 snd_pcm,snd_seq
snd 51038 5 snd_bcm2835,snd_timer,snd_pcm,snd_seq,snd_seq_dev\
ice
i2c_bcm2708 4990 0
We can also see the range of drivers that are available via the command;
Which would provide an output similar to the following;
$(uname -r)/kernel/drivers/
base cdrom extcon input mfd nfc rtc staging w1
bcma char gpio leds misc of scsi uio watchdog
block connector hid md mmc power spi usb
bluetooth cpufreq i2c media net pps ssb video
Options
The modprobe command has several options, but the vast majority of users will simply need to install a module which is done using the sudo modprobe [modulename] command (no options needed).
The only realistic command option that a novice user might use would be -r which would remove a module.
Arguments
The module name is the main argument used when executing the modprobe command. Multiple modules can be loaded by simply putting a space between the module names.
Test yourself
- What type of module is used in the Linux kernel vs the Windows kernel and what is the advantage of the Linux kernel approach
- Show how the modules mod1, mod2 and mod3 can all be loaded using one use of the
modprobecommand.
ping
The ping command allows us to check the network connection between the local computer and a remote server. It does this by sending a request to the remote server to reply to a message (kind of like a read-request in email). This allows us to test network connectivity to the remote server and to see if the server is operating. The ping command is a simple and commonly used network troubleshooting tool.
-
ping[options] remote server : checks the connection to a remote server.
To check the connection to the server at CNN for example we can simple execute the following command (assuming that we have a connection to the internet);
Which will return something like the following;
The first thing to note is that by default the ping command will just keep running. When we want to stop it we need to press CTRL-c to get it to stop.
The information presented is extremely useful and tells us that www.cnn.com’s IP address is 157.166.226.25 and that the time taken for a ping send and return message took about 250 milliseconds.
The ping command
The ping command is a very simple network / connectivity checking tool that is one of the default ‘go-to’ commands for system administrators. You might be wondering about how the name has come about. It is reminiscent of the echo-location technique used by dolphins, whales and bats to send out a sound and to judge their surroundings by the returned echo. In the dramatised world of the submariner, a ping is the sound emitted by a submarine in the same way to judge the distance and direction to an object. It was illustrated to best effect in the book by Tom Clancy and the subsequent movie “The Hunt for Red October” where the submarine commander makes the request for “One Ping Only”.

It works by sending message called an ‘Echo Request’ to a specific network location (which we specify as part of the command). When (or if) the server receives the request it sends an ‘Echo Reply’ to the originator that includes the exact payload received in the request. The command will continue to send and (hopefully) receive these echoes until the command completes its requisit number of attempts or the command is stopped by the user (with a CTRL-c). Once complete, the command summarises the effort.
From the example used above we can see the output as follows;
We can see from the returned pings that the IP address of the server that is designated as ‘www.cnn.com’ is ‘157.166.226.25’ The resolution of the IP address would be made possible by DNS, but using a straight IP address is perfectly fine). The icmp_seq= column tells us the sequence of the returned replies and ttl indicates how many IP routers the packet can go through before being thrown away. The time provides the measured return trip of the request and reply.
The summary at completion tells us how many packets were sent and how many received back. This forms a percentage of lost packets which is established over the specified time. The final line provides a minimum, average maximum and standard deviation from the mean.
Options
There are a few different options for use, but the more useful are as follows;
-
-conly ping the connection a certain number (count) of times -
-ichange the time interval between pings
It’s really useful to have ping running continuously so that we can make changes to networking while watching the results, but it’s also useful to run the command for a limited amount of time. This is where the -c option comes in. This will simply restrict the number of pings that are sent out and will then cease and summarise the effort. This can be used as follows;
Which will return something like the following;
Sometimes it can be convenient to set our own time interval between pings. This can be accomplished with the -i option which will let us vary the repeat time. The default is 1 second, however the value cannot be set below 0.2 seconds without doing so as the superuser. Interestingly there is an option to flood the network with pings (flood mode) to test the network infrastructure. However, this would be something typically left to research carefully when you really need it.
Test yourself
- How does the ping command to a server name know how to return an IP address?
- What does ‘ttl’ stand for?
sudo
The sudo command allows a user to execute a command as the ‘superuser’ (or as another user). It is a vital tool for system administration and management.
-
sudo[options] [command] : Execute a command as the superuser
For example, if we want to update and upgrade our software packages, we will need to do so as the super user. All we need to do is prefix the command apt-get with sudo as follows;
One of the best illustrations of this is via the excellent cartoon work of the xkcd comic strip (Buy his stuff, it’s awesome!).

The sudo command
The sudo command is shorthand for ‘superuser do’.
When we use sudo an authorised user is determined by the contents of the file /etc/sudoers.
As an example of usage we should check out the file /etc/sudoers. If we use the cat command to list the file like so;
We get the following response;
That’s correct, the ‘pi’ user does not have permissions to view the file
Let’s confirm that with ls;
Which will result in the following;
1 root root 696 May 7 10:39 /etc/sudoers
It would appear that only the root user can read the file!
So let’s use sudo to cat](#cat) the file as follows;
That will result in the following output;
There’s a lot of information in the file, but there, right at the bottom is the line that determines the privileges for the ‘pi’ user;
We can break down what each section means;
pi
pi ALL=(ALL) NOPASSWD: ALL
The pi portion is the user that this particular rule will apply to.
ALL
pi ALL=(ALL) NOPASSWD: ALL
The first ALL portion tells us that the rule applies to all hosts.
ALL
pi ALL=(ALL) NOPASSWD: ALL
The second ALL tells us that the user ‘pi’ can run commands as all users and all groups.
NOPASSWD
pi ALL=(ALL) NOPASSWD: ALL
The NOPASSWD tells us that the user ‘pi’ won’t be asked for their password when executing a command with sudo.
All
pi ALL=(ALL) NOPASSWD: ALL`
The last ALL tells us that the rules on the line apply to all commands.
Under normal situations the use of sudo would require a user to be authorised and then enter their password. By default the Raspbian operating system has the ‘pi’ user configured in the /etc/sudoers file to avoid entering the password every time.
If your curious about what privileges (if any) a user has, we can execute sudo with the -l option to list them;
This will result in output that looks similar to the following;
for pi on this host:
env_reset, mail_badpass,
secure_path=/usr/local/sbin\:/usr/local/bin\:/usr/sbin\:/usr/bin\:/sbin\:/bin
User pi may run the following commands on this host:
(ALL : ALL) ALL
(ALL) NOPASSWD: ALL
The ‘sudoers’ file
As mentioned above, the file that determines permissions for users is /etc/sudoers. DO NOT EDIT THIS BY HAND. Use the visudo command to edit. Of course you will be required to run the command using sudo;
sudo vs su
There is a degree of confusion about the roles of the sudo command vs the su command. While both can be used to gain root privileges, the su command actually switches the user to another user, while sudo only runs the specified command with different privileges. While there will be a degree of debate about their use, it is widely agreed that for simple on-off elevation, sudo is ideal.
Test yourself
- Write an entry for the
sudoersfile that provides sudo priviledges to a user for only thecatcommand. - Under what circumstances can you edit the
sudoersfile with a standard text editor.
Directory Structure Cheat Sheet
-
/: The ‘root’ directory which contains all other files and directories -
/bin: Common commands / programs, shared by all users -
/boot: Contains the files needed to successfully start the computer during the boot process -
/dev: Holds device files that represent physical and ‘logical’ devices -
/etc: Contains configuration files that control the operation of programs -
/etc/cron.d: One of the directories that allow programs to be run on a regular schedule -
/etc/rc?.d: Directories containing files that control the mode of operation of a computer -
/home: A directory that holds subdirectories for each user to store user specific files -
/lib: Contains shared library files and kernel modules -
/lost+found: Will hold recoverable data in the event of an an improper shut-down -
/media: Used to temporarily mount removable devices -
/mnt: A mount point for filesystems or temporary mount point for system administrators -
/opt: Contains third party or additional software that is not part of the default installation -
/proc: Holds files that contain information about running processes and system resources -
/root: The home directory of the System Administrator, or the ‘root’ user -
/sbin: Contains binary executables / commands used by the system administrator -
/srv: Provides a consistent location for storing data for specific services -
/tmp: A temporary location for storing files or data -
/usr: Is the directory where user programs and data are stored and shared -
/usr/bin: Contains binary executable files for users -
/usr/lib: Holds shared library files to support executables in/usr/binand/usr/sbin -
/usr/local: Contains users programs that are installed locally from source code -
/usr/sbin: The directory for non-essential system administration binary executables -
/var: Holds variable data files which are expected to grow under normal circumstances -
/var/lib: Contains dynamic state information that programs modify while they run -
/var/log: Stores log files from a range of programs and services -
/var/spool: Contains files that are held (spooled) for later processing -
/var/tmp: A temporary store for data that needs to be held between reboots (unlike/tmp)
